How to compile Less, sass/scss, JSX, ES6, CoffeeScript in visual studio

October 26, 2020 0 comments

 It is very easy to compile LESS and SCSS files in visual studio. To do this we have to use Web Compiler extension. Web compiler extension generates css file from LESS and SCSS files on run time.


Lets Install the Extension


Simply download and install the extension. WebCompiler extension allows us to compile LESS, Sass, JSX, ES6 and CoffeeScript files.

Followings are the features of this extension
  • Compilation of LESS, Scss, Stylus, JSX, ES6 and CoffeeScript files
  • Saving a source file which triggers re-compilation automatically
  • Specify compiler options for each individual file
  • Error list is integrated
  • MSBuild support for CI scenarios
  • Minify the compiled output
  • Customizable minification options for each language
  • Displays a watermark when opening generated file
  • Shortcut to compile all specified files in solution
  • Task runner explorer is integrated
  • Command line interface
Lets assume we have Visual studio solution and it Contains SCSS files, it can contain files with any of these extensions .less.scss.styl.jsx.es6 or .coffee

Any of above extensions can be compiled, for this article lets consider only scss extension, 
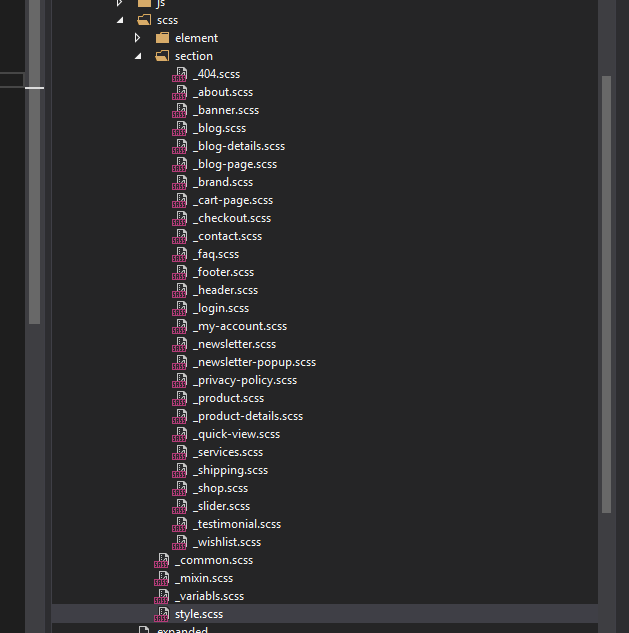
We have many scss files like the following image

How to compile scss in visual studio


We have style.scss file which combines all the scss files, it looks like as follows


@import 'variabls';
@import 'mixin';
@import 'common';
@import 'element/button';
@import 'section/header';
@import 'section/slider';
@import 'section/banner';
@import 'section/product';
@import 'section/blog';
@import 'section/newsletter';
@import 'section/shipping';
@import 'section/testimonial';
@import 'section/brand';
@import 'section/footer';
@import 'section/shop';
@import 'section/product-details';
@import 'section/cart-page';
@import 'section/checkout';
@import 'section/wishlist';
@import 'section/contact';
@import 'section/login';
@import 'section/faq';
@import 'section/my-account';
@import 'section/about';
@import 'section/services';
@import 'section/blog-page';
@import 'section/blog-details';
@import 'section/quick-view';
@import 'section/newsletter-popup';
@import 'section/404';
@import 'section/privacy-policy';

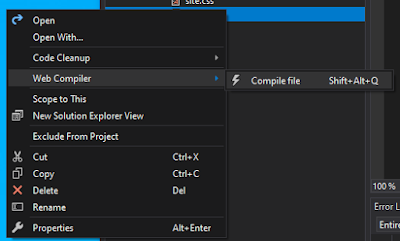
Now simply right click on the style.scss file and click on Web Compiler > Compile file.

compile scss in visual studio


A file named compilerconfig.json is created in the root of the project. This file looks like.
[
  {
    "outputFile": "wwwroot/assets/css/style.css",
    "inputFile": "wwwroot/assets/scss/style.scss"
  }
]
We can always change the outputFile path to our css folder, I have changed it in this example to css file. Similary there is one more file named compilerconfig.json.defaults which get generated and can be used to configure minification of js/css, check following file and you can modify it as per your requirements
{
  "compilers": {
    "less": {
      "autoPrefix": "",
      "cssComb": "none",
      "ieCompat": true,
      "strictMath": false,
      "strictUnits": false,
      "relativeUrls": true,
      "rootPath": "",
      "sourceMapRoot": "",
      "sourceMapBasePath": "",
      "sourceMap": false
    },
    "sass": {
      "autoPrefix": "",
      "includePath": "",
      "indentType": "space",
      "indentWidth": 2,
      "outputStyle": "nested",
      "Precision": 5,
      "relativeUrls": true,
      "sourceMapRoot": "",
      "lineFeed": "",
      "sourceMap": false
    },
    "stylus": {
      "sourceMap": false
    },
    "babel": {
      "sourceMap": false
    },
    "coffeescript": {
      "bare": false,
      "runtimeMode": "node",
      "sourceMap": false
    },
    "handlebars": {
      "root": "",
      "noBOM": false,
      "name": "",
      "namespace": "",
      "knownHelpersOnly": false,
      "forcePartial": false,
      "knownHelpers": [],
      "commonjs": "",
      "amd": false,
      "sourceMap": false
    }
  },
  "minifiers": {
    "css": {
      "enabled": true,
      "termSemicolons": true,
      "gzip": false
    },
    "javascript": {
      "enabled": true,
      "termSemicolons": true,
      "gzip": false
    }
  }
}
This is how we can compile Less, sass/scss, jsx, CoffeeScript in visual studio, we can also use this web pack to minify JS files.

How DBCC CHECKIDENT Works - How to Reset identity seed after deleting records in SQL Server

October 23, 2020 0 comments
Scenario I faced

I have inserted records into a SQL Server database table. 

The table had a primary key defined and the auto increment identity seed is set to “Yes”.  So now whenever I do an insert in DB my primary key ID starts with number 1,2,3 and so on.

Now say I have total 100 records and I delete all the records, in this case when I insert new records its primary key ID starts with 101, where as I want it to reset to 1. 

So after deleting all records from SQL Server data table, I wanted to reset identity seed to 0, so my next insert should have primary key as 1,2,3 and so on.

Use following Command to Reset SEED

DBCC CHECKIDENT (table_name [, { NORESEED | { RESEED [, new_reseed_value ]}}]) [ WITH NO_INFOMSGS ]

Example : 

  DBCC CHECKIDENT ('[TableName]', RESEED, 0); GO

Above example will Reset Identity value to initial value i.e. new entry will start from 1

In case we want to Force Identity value to set to Some specific number we use it as follows DBCC 


CHECKIDENT ('[TableName]', RESEED, 10);


So what is the Seed value and when we cannot reset it

The seed value is the value inserted into an identity column for the first row loaded into the table. All subsequent rows contain the current identity value plus the increment value where current identity value is the last identity value generated for the table or view.

You can't use DBCC CHECKIDENT for the following tasks:

  • We cannot Change the original seed value specified for an identity column when the table or view was created.

  • Cannot be used to Reseed existing rows in a table or view.

To change the original seed value and reseed any existing rows, we need to drop the identity column and recreate it specifying the new seed value. When the table contains data, the identity numbers are added to the existing rows with the specified seed and increment values. The order in which the rows are updated isn't guaranteed.