After Configuring IIS on VM Server - How to access sites hosted on IIS On VM over internet

December 25, 2020 0 comments

 Once we are done with Installing IIS on Azure VM, we need to open port 80 to access hosted website from internet.

Check - How to Setup IIS On Azure VM

To Enable port 80, simply login to your Azure portal, and click on VM

VM networking

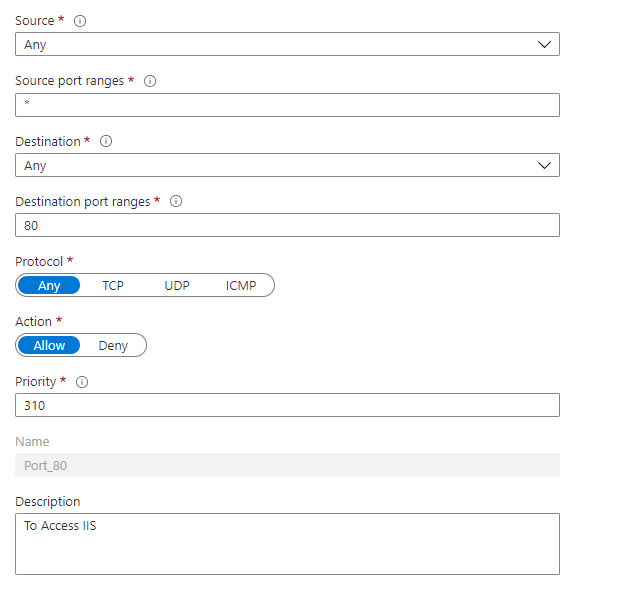
Then click on Networking, on click of Networking, network interface will open up, then clikc on Add Inbound port rule.

And add port 80

Adding Port 80 to Azure network inbound rule

Once you create a rule, simply hit the Azure VM IP address from browser, it should show you default IIS page.


This is how we allow HTTP traffic to IIS hosted site on Azure VM server

How To Setup IIS on Azure VM - Configure IIS on Azure VM

December 25, 2020 0 comments

 Once we have setup the Azure VM, next important thing is to Setup an IIS in the windows server and enable it to access from anywhere. So that we can host our web application on VM and access it over an Internet.

In this article, we shall achieve it.

To Enable IIS on Azure VM server

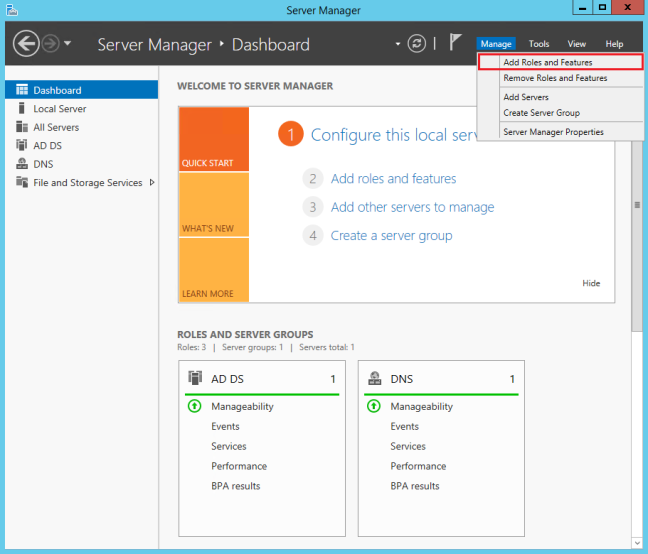
  • Under Server Manager click on Manage > Add Roles and Features
Azure vm - Server Manager- Manage - Add Roles and Features


Once we click on Add Roles and Features following screen will appear

Add Roles and Features Wizard

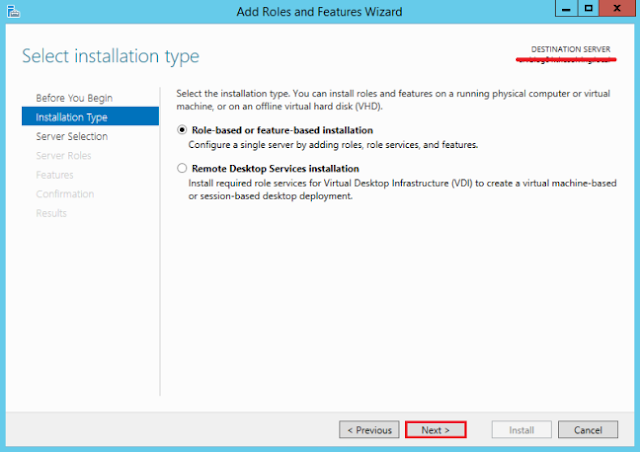
Click next and go to Select Installation Type, select Role-Based or feature-based installation

Add Roles and Features Wizard - Installation Type

On click of Next you will go to Server Selection screen, here you will see default server under server pool. Make sure Select a server from the server pool is selected

Add Roles and Features - Select Destination server

Now in Server Roles select Web Server (IIS)

Add Roles and Features - Web Server (IIS)

Once we select Web Server (IIS) and click on Next, one pop up will appear, click on Add Features, check following image

Add Toles and Features - Add Features

Now select .Net framework 4.5 Features and any other required feature from list and click on next

Add Roles and Features - .Net Framework

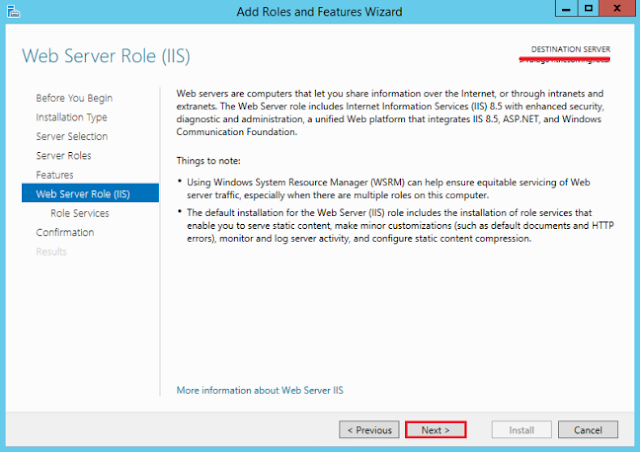
Click on Next 

Add Roles and Features - Web Server Role (IIS)

Click on Next and Select from Role Services

Add Roles and Features Wizard - Role Services

Now you will see confirmation screen 

Add Roles and Features - Confirmation

Now on click of install, IIS will be installed on Azure VM. 

Add Roles and Features - IIS Installation

You can run IIS using inetmgr command

Do Win+R and type inetmger and IIS will open up.


This is how we should Setup IIS on Azure VM 


The razortaghelper task failed unexpectedly

December 01, 2020 0 comments

 After updating Visual studio to New version, I suddenly started getting error 

the razortaghelper task failed unexpectedly


Well after doing some research on Internet I came across following solutions


Added the following environment variable to my user environment to make it build again:
DOTNET_HOST_PATH

%ProgramFiles%\dotnet\dotnet.exe 


Simply go to Environment Variable, check following images


Environment Variable


After clicking on Environment Variables, click on New, Pop up will open up, simply add entries as per following image and click Ok

Updating Environment variables for the razortaghelper task failed unexpectedly

Now when you build The razortaghelper task failed unexpectedly error will go away.