After Configuring IIS on VM Server - How to access sites hosted on IIS On VM over internet

December 25, 2020 0 comments

 Once we are done with Installing IIS on Azure VM, we need to open port 80 to access hosted website from internet.

Check - How to Setup IIS On Azure VM

To Enable port 80, simply login to your Azure portal, and click on VM

VM networking

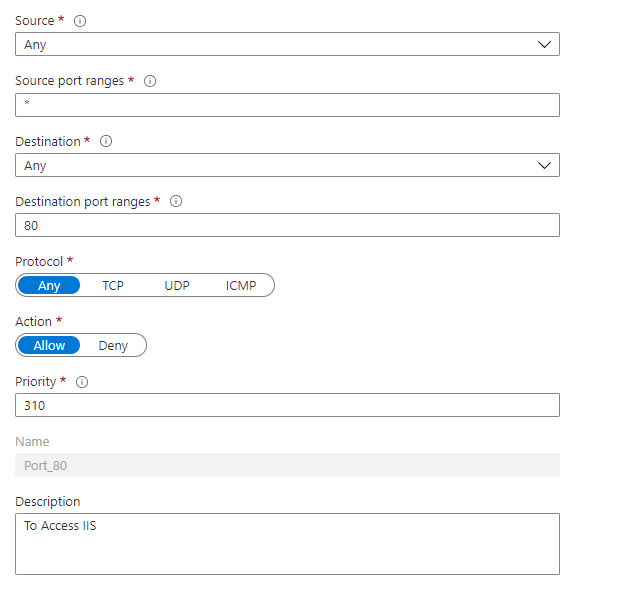
Then click on Networking, on click of Networking, network interface will open up, then clikc on Add Inbound port rule.

And add port 80

Adding Port 80 to Azure network inbound rule

Once you create a rule, simply hit the Azure VM IP address from browser, it should show you default IIS page.


This is how we allow HTTP traffic to IIS hosted site on Azure VM server

How To Setup IIS on Azure VM - Configure IIS on Azure VM

December 25, 2020 0 comments

 Once we have setup the Azure VM, next important thing is to Setup an IIS in the windows server and enable it to access from anywhere. So that we can host our web application on VM and access it over an Internet.

In this article, we shall achieve it.

To Enable IIS on Azure VM server

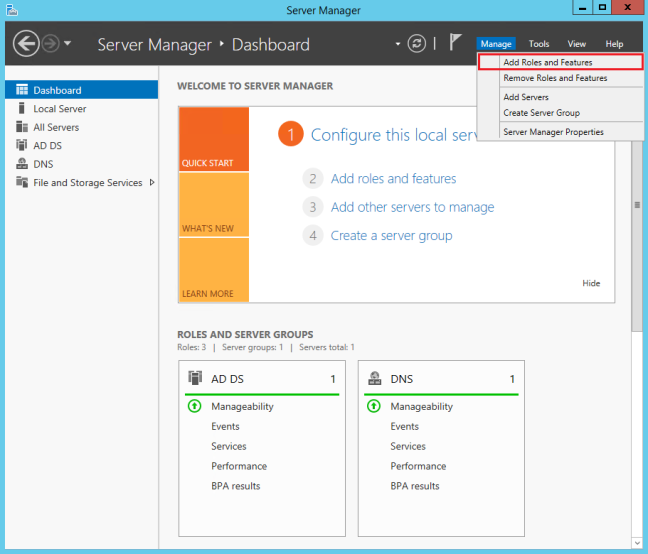
  • Under Server Manager click on Manage > Add Roles and Features
Azure vm - Server Manager- Manage - Add Roles and Features


Once we click on Add Roles and Features following screen will appear

Add Roles and Features Wizard

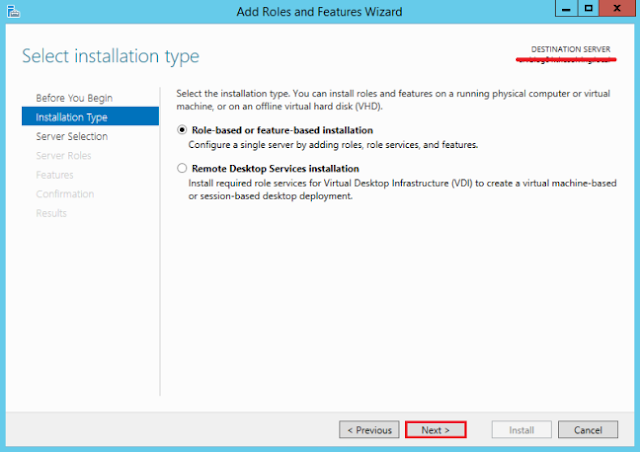
Click next and go to Select Installation Type, select Role-Based or feature-based installation

Add Roles and Features Wizard - Installation Type

On click of Next you will go to Server Selection screen, here you will see default server under server pool. Make sure Select a server from the server pool is selected

Add Roles and Features - Select Destination server

Now in Server Roles select Web Server (IIS)

Add Roles and Features - Web Server (IIS)

Once we select Web Server (IIS) and click on Next, one pop up will appear, click on Add Features, check following image

Add Toles and Features - Add Features

Now select .Net framework 4.5 Features and any other required feature from list and click on next

Add Roles and Features - .Net Framework

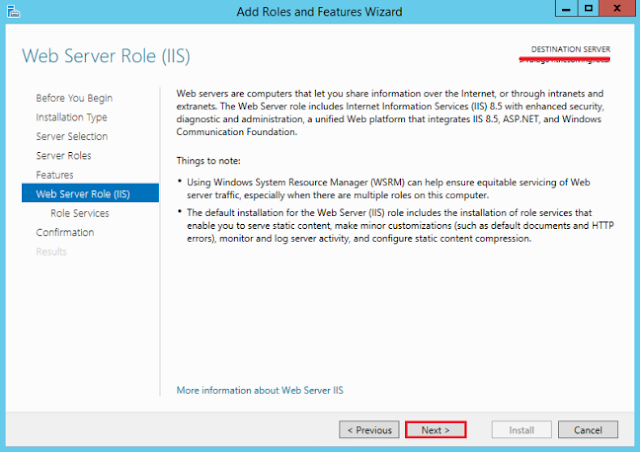
Click on Next 

Add Roles and Features - Web Server Role (IIS)

Click on Next and Select from Role Services

Add Roles and Features Wizard - Role Services

Now you will see confirmation screen 

Add Roles and Features - Confirmation

Now on click of install, IIS will be installed on Azure VM. 

Add Roles and Features - IIS Installation

You can run IIS using inetmgr command

Do Win+R and type inetmger and IIS will open up.


This is how we should Setup IIS on Azure VM 


The razortaghelper task failed unexpectedly

December 01, 2020 0 comments

 After updating Visual studio to New version, I suddenly started getting error 

the razortaghelper task failed unexpectedly


Well after doing some research on Internet I came across following solutions


Added the following environment variable to my user environment to make it build again:
DOTNET_HOST_PATH

%ProgramFiles%\dotnet\dotnet.exe 


Simply go to Environment Variable, check following images


Environment Variable


After clicking on Environment Variables, click on New, Pop up will open up, simply add entries as per following image and click Ok

Updating Environment variables for the razortaghelper task failed unexpectedly

Now when you build The razortaghelper task failed unexpectedly error will go away.


How to compile Less, sass/scss, JSX, ES6, CoffeeScript in visual studio

October 26, 2020 0 comments

 It is very easy to compile LESS and SCSS files in visual studio. To do this we have to use Web Compiler extension. Web compiler extension generates css file from LESS and SCSS files on run time.


Lets Install the Extension


Simply download and install the extension. WebCompiler extension allows us to compile LESS, Sass, JSX, ES6 and CoffeeScript files.

Followings are the features of this extension
  • Compilation of LESS, Scss, Stylus, JSX, ES6 and CoffeeScript files
  • Saving a source file which triggers re-compilation automatically
  • Specify compiler options for each individual file
  • Error list is integrated
  • MSBuild support for CI scenarios
  • Minify the compiled output
  • Customizable minification options for each language
  • Displays a watermark when opening generated file
  • Shortcut to compile all specified files in solution
  • Task runner explorer is integrated
  • Command line interface
Lets assume we have Visual studio solution and it Contains SCSS files, it can contain files with any of these extensions .less.scss.styl.jsx.es6 or .coffee

Any of above extensions can be compiled, for this article lets consider only scss extension, 
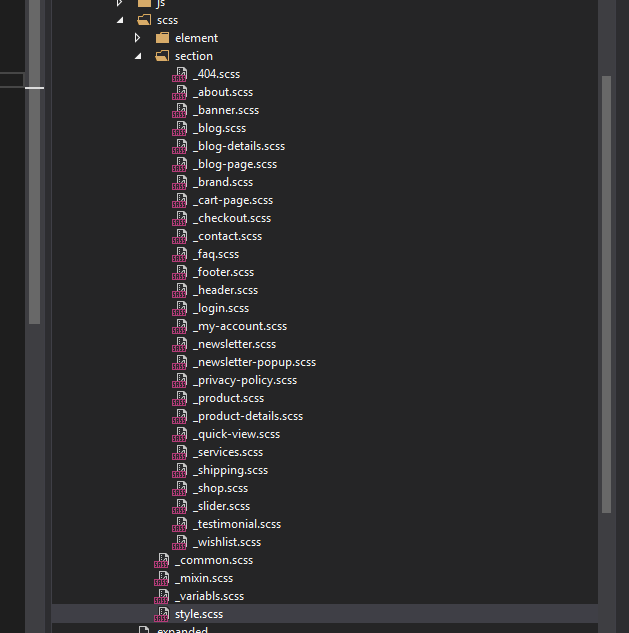
We have many scss files like the following image

How to compile scss in visual studio


We have style.scss file which combines all the scss files, it looks like as follows


@import 'variabls';
@import 'mixin';
@import 'common';
@import 'element/button';
@import 'section/header';
@import 'section/slider';
@import 'section/banner';
@import 'section/product';
@import 'section/blog';
@import 'section/newsletter';
@import 'section/shipping';
@import 'section/testimonial';
@import 'section/brand';
@import 'section/footer';
@import 'section/shop';
@import 'section/product-details';
@import 'section/cart-page';
@import 'section/checkout';
@import 'section/wishlist';
@import 'section/contact';
@import 'section/login';
@import 'section/faq';
@import 'section/my-account';
@import 'section/about';
@import 'section/services';
@import 'section/blog-page';
@import 'section/blog-details';
@import 'section/quick-view';
@import 'section/newsletter-popup';
@import 'section/404';
@import 'section/privacy-policy';

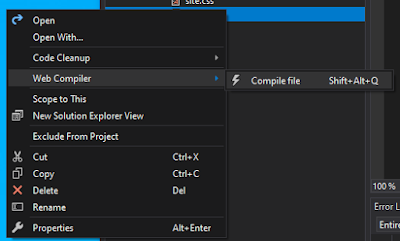
Now simply right click on the style.scss file and click on Web Compiler > Compile file.

compile scss in visual studio


A file named compilerconfig.json is created in the root of the project. This file looks like.
[
  {
    "outputFile": "wwwroot/assets/css/style.css",
    "inputFile": "wwwroot/assets/scss/style.scss"
  }
]
We can always change the outputFile path to our css folder, I have changed it in this example to css file. Similary there is one more file named compilerconfig.json.defaults which get generated and can be used to configure minification of js/css, check following file and you can modify it as per your requirements
{
  "compilers": {
    "less": {
      "autoPrefix": "",
      "cssComb": "none",
      "ieCompat": true,
      "strictMath": false,
      "strictUnits": false,
      "relativeUrls": true,
      "rootPath": "",
      "sourceMapRoot": "",
      "sourceMapBasePath": "",
      "sourceMap": false
    },
    "sass": {
      "autoPrefix": "",
      "includePath": "",
      "indentType": "space",
      "indentWidth": 2,
      "outputStyle": "nested",
      "Precision": 5,
      "relativeUrls": true,
      "sourceMapRoot": "",
      "lineFeed": "",
      "sourceMap": false
    },
    "stylus": {
      "sourceMap": false
    },
    "babel": {
      "sourceMap": false
    },
    "coffeescript": {
      "bare": false,
      "runtimeMode": "node",
      "sourceMap": false
    },
    "handlebars": {
      "root": "",
      "noBOM": false,
      "name": "",
      "namespace": "",
      "knownHelpersOnly": false,
      "forcePartial": false,
      "knownHelpers": [],
      "commonjs": "",
      "amd": false,
      "sourceMap": false
    }
  },
  "minifiers": {
    "css": {
      "enabled": true,
      "termSemicolons": true,
      "gzip": false
    },
    "javascript": {
      "enabled": true,
      "termSemicolons": true,
      "gzip": false
    }
  }
}
This is how we can compile Less, sass/scss, jsx, CoffeeScript in visual studio, we can also use this web pack to minify JS files.

How DBCC CHECKIDENT Works - How to Reset identity seed after deleting records in SQL Server

October 23, 2020 0 comments
Scenario I faced

I have inserted records into a SQL Server database table. 

The table had a primary key defined and the auto increment identity seed is set to “Yes”.  So now whenever I do an insert in DB my primary key ID starts with number 1,2,3 and so on.

Now say I have total 100 records and I delete all the records, in this case when I insert new records its primary key ID starts with 101, where as I want it to reset to 1. 

So after deleting all records from SQL Server data table, I wanted to reset identity seed to 0, so my next insert should have primary key as 1,2,3 and so on.

Use following Command to Reset SEED

DBCC CHECKIDENT (table_name [, { NORESEED | { RESEED [, new_reseed_value ]}}]) [ WITH NO_INFOMSGS ]

Example : 

  DBCC CHECKIDENT ('[TableName]', RESEED, 0); GO

Above example will Reset Identity value to initial value i.e. new entry will start from 1

In case we want to Force Identity value to set to Some specific number we use it as follows DBCC 


CHECKIDENT ('[TableName]', RESEED, 10);


So what is the Seed value and when we cannot reset it

The seed value is the value inserted into an identity column for the first row loaded into the table. All subsequent rows contain the current identity value plus the increment value where current identity value is the last identity value generated for the table or view.

You can't use DBCC CHECKIDENT for the following tasks:

  • We cannot Change the original seed value specified for an identity column when the table or view was created.

  • Cannot be used to Reseed existing rows in a table or view.

To change the original seed value and reseed any existing rows, we need to drop the identity column and recreate it specifying the new seed value. When the table contains data, the identity numbers are added to the existing rows with the specified seed and increment values. The order in which the rows are updated isn't guaranteed.

The entity type 'IdentityUserLogin' requires a primary key to be defined.

June 21, 2020 0 comments
While developing Web application in Asp.net Core Razor page, I have come across following error


InvalidOperationException: The entity type 'IdentityUserLogin<string>' requires a primary key to be defined.
I was doing following thing in my application

  • I wanted to set Unique Key constraint on Email for my two models i.e. Vendor and Member model so I had added code below in my ApplicationDbContext file. (You may have different name for your DbContext file.)


 public class ApplicationDbContext : IdentityDbContext&lt;ApplicationUser>
    {
     public ApplicationDbContext(DbContextOptions<ApplicationDbContext> options)
          : base(options)
        {

        }

        protected override void OnModelCreating(ModelBuilder builder)
        {
            builder.Entity<Member>().HasIndex(m => m.Email).IsUnique();
            builder.Entity<Vendor>().HasIndex(v => v.Email).IsUnique();
        }

        public DbSet<Vendor> Vendors { get; set; }

        public DbSet<Member> Members { get; set; }
        
    }    
Here if we see closely, I am missing base model Creating function. When I build and run code I get error saying 

 InvalidOperationException: The entity type 'IdentityUserLogin' requires a primary key to be defined.

 
The entity type 'IdentityUserLogin' requires a primary key to be defined.

To Resolve this error, I have added   base.OnModelCreating(builder);  in ApplicationDbContext 
check following code 


public class ApplicationDbContext : IdentityDbContext&lt;ApplicationUser>
    {
     public ApplicationDbContext(DbContextOptions<ApplicationDbContext> options)
          : base(options)
        {

        }

        protected override void OnModelCreating(ModelBuilder builder)
        {
            builder.Entity<Member>().HasIndex(m => m.Email).IsUnique();
            builder.Entity<Vendor>().HasIndex(v => v.Email).IsUnique();
            
              base.OnModelCreating(builder);
        }

        public DbSet<Vendor> Vendors { get; set; }

        public DbSet<Member> Members { get; set; }
        
    }     


This blog answers query - How to resolve The entity type 'IdentityUserLogin<string>' requires a primary key to be defined. 

How to disable JavaScript Debugging in Visual Studio

June 17, 2020 0 comments
Though it is a useful feature, while doing development I have observed browser locking due to JS Debugging in Visual Studio.

Though I know JS debugging in Visual studio is a useful feature, it becomes annoying because you have to open new instance of application. 

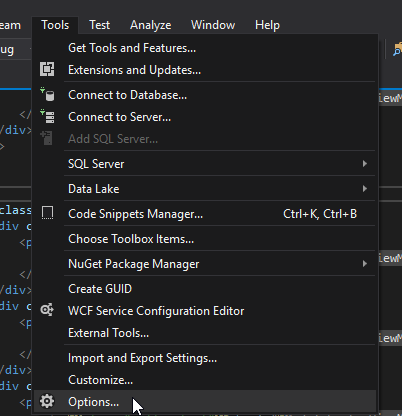
To Disable Java script debugging in visual studio go to Tools > Options

Disable JavaScript Debugging in Visual Studio


Click on Options and option window will open.

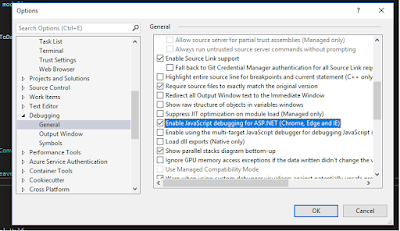
Then scroll down on the left menu to select option Debugging -> General . Then search for thes setting labelled “Enable JavaScript debugging for ASP.NET (Chrome and IE)” and uncheck it.


Disable JavaScript Debugging in Visual Studio - Debugging options


This is how we should disable Js debugging in visual studio 2019

MEAN stack environment on the AWS EC2 instance server for free

May 22, 2020 0 comments
Before we start, we have to make sure that AWS account is created. If you don't have AWS account then please create an account with AWS.  By default All new AWS users are placed in the free usage tier. AWS free tire grants, among other features, 750 hrs/month of free Amazon EC2 micro access .  While creating an account, be sure to choose the Basic (Free) option.

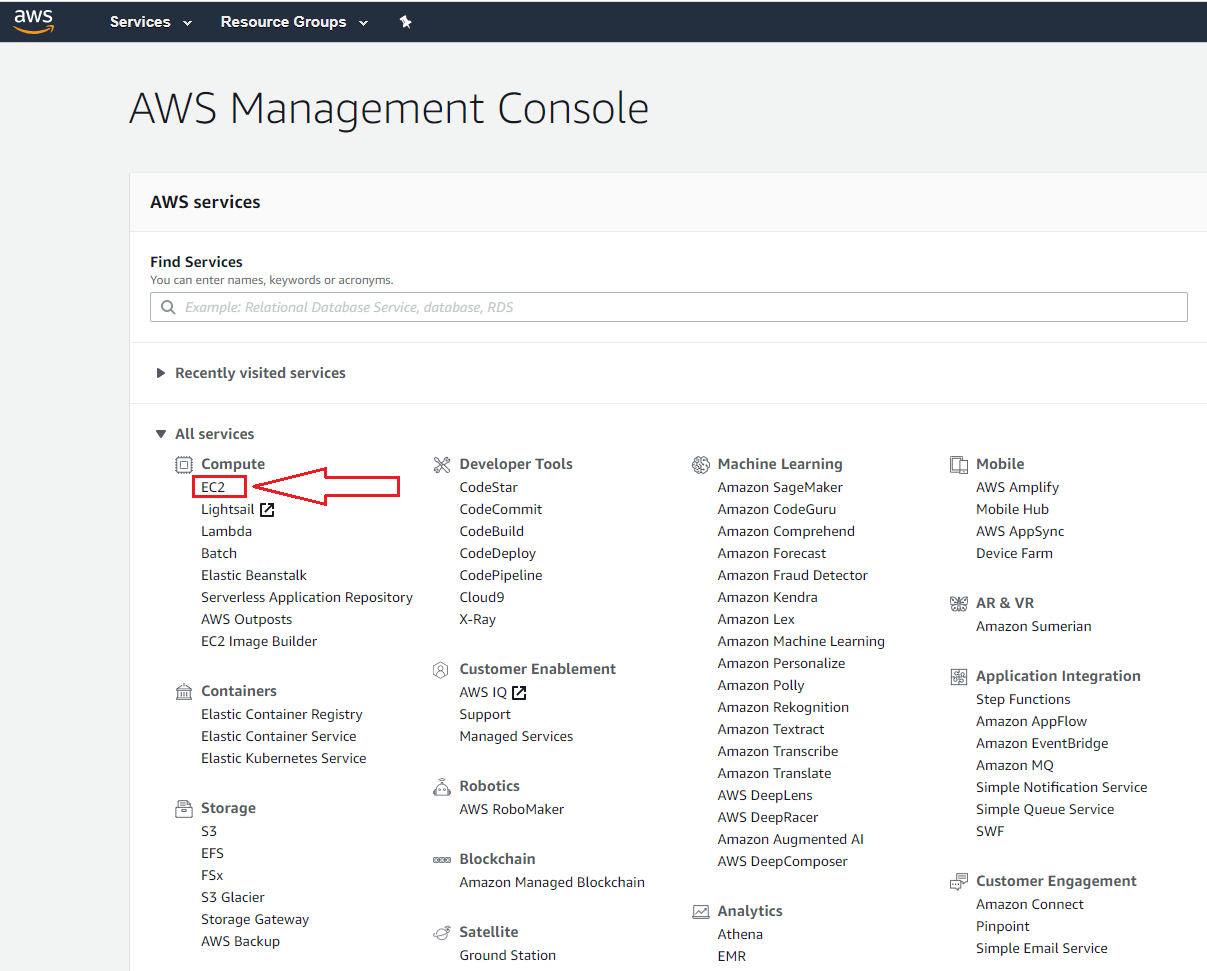
After this click on Sign into Console and login using your credentials, after login go to AWS Management Console  & as shown in image Click on EC2

Mean stack environment on the AWS EC2 instance


On click of EC2, you will be landed on Dashboard. check following image for same. To create Bitnami Mean Instance on EC2 Free Tier on AWS, click on Launch Instance

Launch MEAN stack instance on EC2


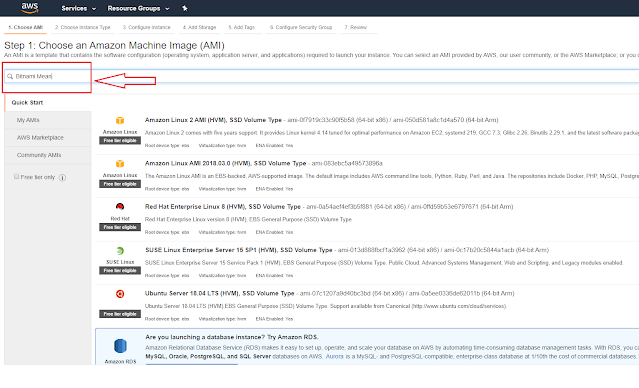
On click of Launch Instance, you will be redirected to Choose An Amazon Machine Image (AMI), at this point search for "BITNAMI MEAN"

Mean Certified by Bitnam
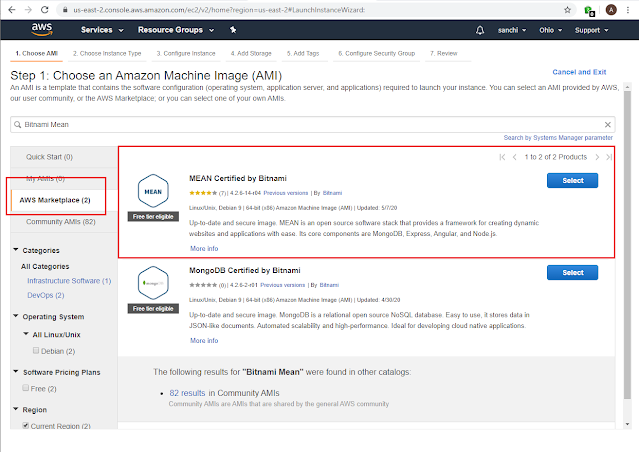
After search click on AWS Marketplace, select Mean Certified by Bitnami

Select Mean Certified by Bitnam on Aws
 

On click of select,  you will see screen mentioning following details
  • MEAN Certified by Bitnami: MEAN gives you the abilty to start building dynamic web applications by providing a complete framework to write your app code. This image is configured for production environments. It includes SSL auto-configuration with Let's Encrypt certificates, and the latest releases of Javascript components: MongoDB, Express, Angular, and Node.js. It ..
Highlights
  • Ready to run JavaScript software stack consisting of MongoDB, Express, Angular, and Node.js. It includes everything necessary to build modern, scalable web applications. Just launch the Bitnami MEAN Stack in the cloud and add your code in minutes.
  • In addition to the core components, the stack also includes an Apache web server, PHP, RockMongo, and Git.
  • This image is regularly updated with the latest stable release of each component.
Mean Certified by Bitnam Free tire


On click of continue- choose an Instance Type

Mean Certified by Bitnam Choose Instance type


On final of Review and Launch  you will be redirected to Review screen. This is final screen to create MEAN stack environment on the AWS EC2 instance server for free.

Mean Certified by Bitnam Launch

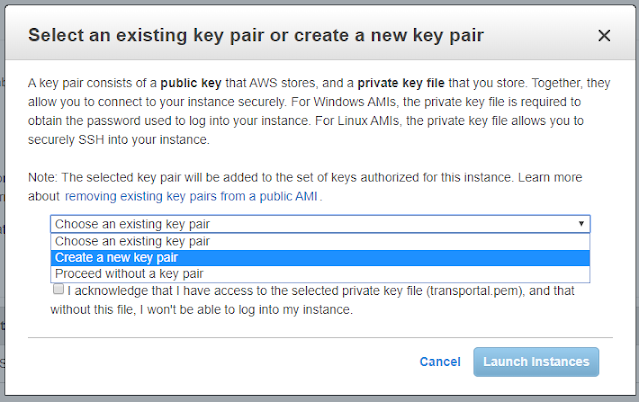
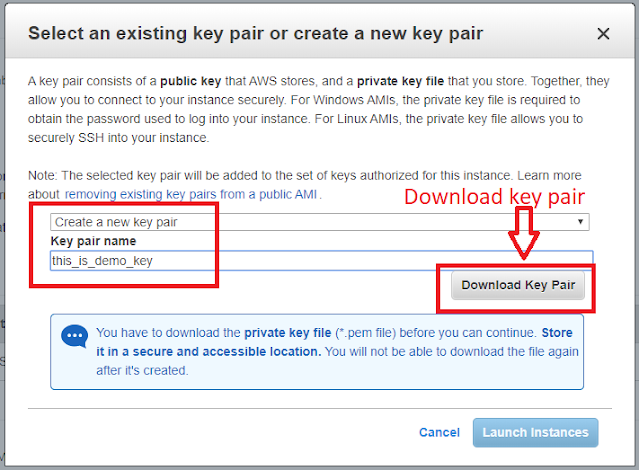
Now we shall get a screen to download Key, this key we will be using to connect to our MEAN stack EC2 instance. Here we shall generate new key pair.

Key Pair creation for SSH login

Here select Create a new key pair, and give name to the key, and Download Key Pair

Download SSH Key pair for MEAN stack enviornment

After downloading Key Pair, Launch Instances button will be Enabled. Then click on Launch Instance. Now we can see our instance running in Console

Now we have successfully created MEAN stack Bitnami instance on the AWS EC2 server for free. 


Connecting to MEAN stack Bitnami instance on AWS EC2 server

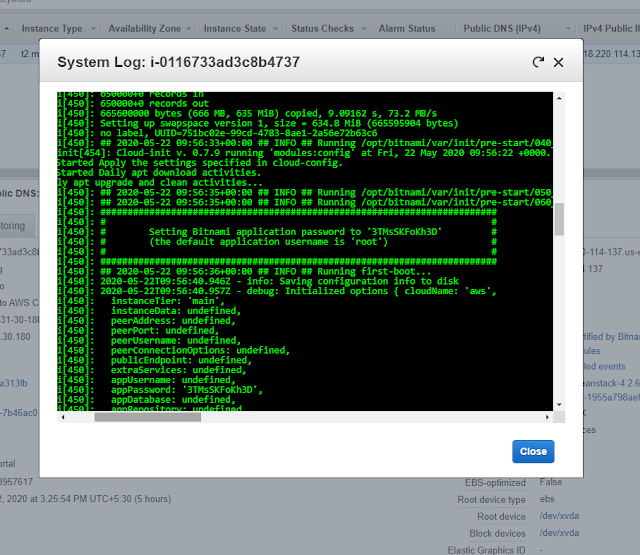
This is important step, please read carefully, As Bitnami MEAN installation is pre-configured with Mongo Admin and Password, we need to get Root user password from System Log. This password is set only once.

To obtain our Mongo Root user password, right click on the row of Mean EC2 instance and navigate to Instance Settings > Get System Log
Get mongo user root password

Scroll through the system log, till you see a box with word : 

Setting bitnami application password to 

This is your initial mongo db password, copy it and keep it safe, Do not lose the password, You will only be shown it Once!!!  You will need this password in order to get access to your Mongo DB

Mongo db password
 

Connect MEAN Bitnami AWS EC2 instance using SSH

To connect our MEAN EC2 instance using SSH, we are going to use PUTTY .
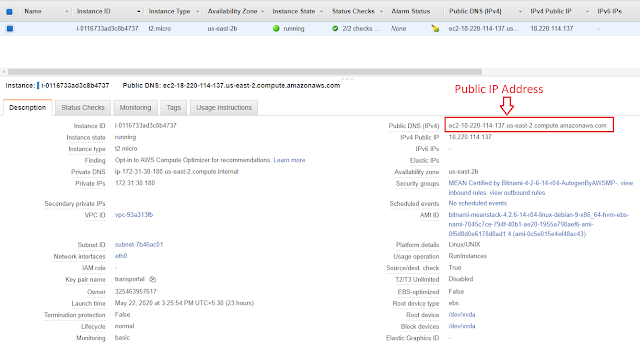
Once we are done in installing Putty, lets get back to Aws dashboard, click on our running instance. Check in Description tab, there is Public DNS (IPv4); this represent the Url where our application will sit and the hostname we will be connecting to.

MEAN stack on AWS EC2 IP Address


to check if server is working, simply copy paste this in browser, and browser should display default landing page of BITNAMI.

MEAN Stack AWS EC2 instance Launched Successfully


we will be using this Host Name along with the .pem security key we downloaded earlier to connect to your EC2 instance.


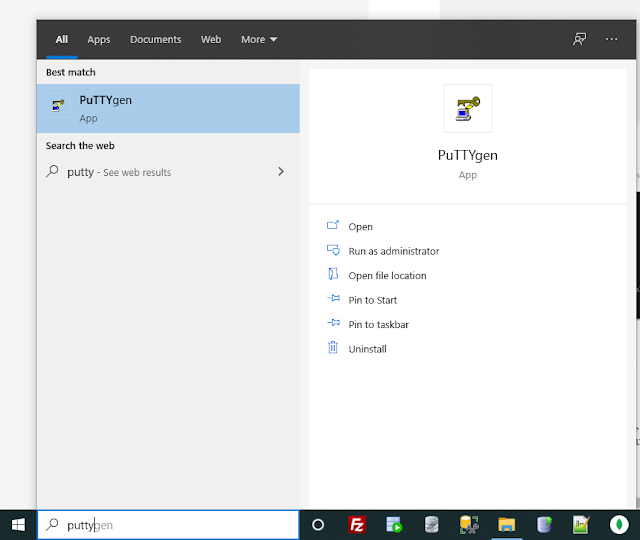
But before we can proceed with our connection, we need to convert your .pem file into a .ppk file that PuTTY can recognize. For this you will need the program PuTTYgen. Download and install PuTTY.  After download simply run PuTTYgen

PuTTYgen - MEAN stack AWS EC2 instance


Once we start PuTTYgen load downloaded .pem file, make sure you switch the file types to "All files" when browsing for your key. Once its loaded, click “Save Private Key” and re-save your file as a PuTTY Private Key file (.ppk).

MEAN AWS EC2 Instance Putty Gen SSH Key

Now lets connect to our server using Putty, open Putty, Add our DNS IP from AWS console, we discussed earlier in this article.

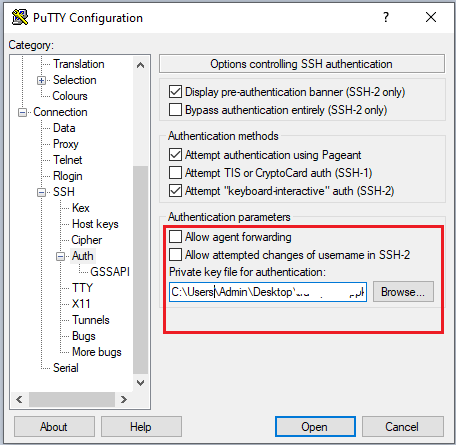
Add our SSH key in Auth, check following images for better understanding.

Put IP Address of MEAN Stack AWS EC2 in Putty

MEAN Stack AWS EC2 - Key selection in Putty

Now click on open, this will connect us to Our MEAN stack AWS EC2 instance, default user name is bitnami.
MEAN Stack connect using PUTTY


Now we have successfully create AWS EC2 MEAN instance and connected to it using SSH.

Introduction to React JS

March 31, 2020 0 comments
React JS is a popular JavaScript Library for building User Interfaces, which has created by Facebook. With React Js we can build fast Single Page Applications or websites with React.


To start with React Introduction, lets answer the very basic question

Is React JS a Library or a Framework?

Answer to this basic and unclear question is, React is a Library and not a Framework. 
React Definition from its official site says - React is a Library for Building User Interfaces.

What is a Library ? 

Library in a very simple terms is nothing but a collection of codes, which can be used easily by developers e.g. JQuery is a library, we can simply use it. 

What is a Framework ?

Framework is a complete code package with its own libraries and functionalities. Framework has its own rules. E.g. Angular is a Framework 
How override ASP.NET Core Identity's password policy or How To Customize Password Policy in asp.net Core

February 07, 2020 0 comments
ASP.NET Core Identity uses default values for  password policy settings, in this article we shall see how to override or customize Asp.net Core Identity's password policy ?

By default, Identity requires that passwords contain an

  • uppercase character
  • lowercase character,
  • a digit
  • a non-alphanumeric character. 
  • Passwords must be at least six characters long. 

PasswordOptions
can be set in Startup.ConfigureServices.
To change password Policy, we shall add following lines of code in startup.cs file


 services.Configure(options =>
             {
                 // Password settings
                 options.Password.RequireDigit = true;
                 options.Password.RequiredLength = 6;
                 options.Password.RequireNonAlphanumeric = false;
                 options.Password.RequireUppercase = false;
                 options.Password.RequireLowercase = false;
             });


ionic 4 bluetooth low energy - example code - Read Data from BLE Devices

January 24, 2020 8 comments
Please refer two articles, for better understanding of BLE and IONIC connectivity and how to implement ionic 4 Bluetooth low energy devices communication.


In this article we shall communicate with BLE (Bluetooth Low energy) device with IONIC4.

To start BLE device we need to send some Command in my case it is ST (start + enter). 
Note: BLE takes one character at a time and also in HEX 
Hex code for S - 53 
Hex code for T - 54
Hex code for LF (Line feed) - 0A 

Also BLE device has their own Services and Characteristics, in previous article we had listed all the services associated with selected device. ref following code in previous article in details page (details.page.html)


<ion-list>
<ion-item ngfor="let service of peripheral.services">
  {{service}}
</ion-item>
</ion-list>


Standard BLE service is FFE0 and BLE characteristic with WriteWithoutResponse is FFE1

After connecting to BLE devices; we need to do following tasks to start reading data

  1. WriteWithoutResponse (Service FFE0 and Characteristic FFE1)
  2. Then Subscribe  to start getting value change notification  for Service FFE0 and Characteristic FFE1
Check following two snippets one for WriteWithoutResponse and another for StartGettingNotification


BleWrite() {

        // Subscribe for notifications when the resitance changes
        var inputdata = new Uint8Array(3);
        inputdata[0] = 0x53; // S
        inputdata[1] = 0x54; // T
        inputdata[2] = 0x0a; // LF

        this.ble
            .writeWithoutResponse(
                this.peripheral.id,
                BLE_SERVICE,
                BLE_CHARACTERISTIC,
                inputdata.buffer
            )
            .then(
                data => {
                    debugger;   
                    
                    console.log(data);
                    this.subscribe();
                },
                err => {
                    console.log(err);
                }
            );
    }

And for reading values from BLE device

subscribe() {
        this.ble
            .startNotification(this.peripheral.id,
 BLE_SERVICE, BLE_CHARACTERISTIC)
            .subscribe(
                data => {
                    console.log(data);
                    this.onValueChange(data);
                },
                () =>
               
        this.showAlert(
                 "Unexpected Error",
                 "Failed to subscribe for changes, please try to re-connect."
               )
            );
    }

In above function we are capturing data and passing it to onValueChange function. You can handle your data in onValueChange function. Data which we send and receive from BLE devices is always an ArrayBuffer. In above functions we have passed ST + LineFeed as array buffer input.buffer

So we need two more functions one to convert array buffer into plain character string and another function to capture valuechange


onValueChange(buffer: ArrayBuffer) {
        this.ngZone.run(() => {
            try {
                if (this.dataFromDevice == undefined)
 this.dataFromDevice = this.bytesToString(buffer).replace(/\s+/g, " ");
                else this.dataFromDevice += '
' + this.bytesToString(buffer).replace(/\s+/g, " ");

//Simply assign data to variable dataFromDevice and string concat
            } catch (e) {
                console.log(e);
            }
        });
    }

    bytesToString(buffer) {
        return String.fromCharCode.apply(null, new Uint8Array(buffer));
    }

This is how we read data from BLE devices using IONIC4. Ionic4 Ble example.

ionic 4 bluetooth low energy - sample code - Connect to BLE Devices

January 20, 2020 0 comments
In the previous article I had mentioned how to list BLE (Bluetooth Low energy devices), Please refer to Ionic-4 Bluetooth Low Energy Devices - List BLE Devices article.

In last article we had page Home, we had displayed BLE devices as follows. 
Ionic 4 - Ble - Bluetoothe low energy devices listing
List BLE Devices - IONIC 4

Now on click of Device, we shall redirect to Detail page, we shall pass BLE device information to Detail page. Thus we have modified our code of home.page.ts file as follows 


import { BLE } from '@ionic-native/ble/ngx';
import { Component, NgZone } from '@angular/core';
import { ToastController } from '@ionic/angular';
import { Router, NavigationExtras } from '@angular/router';

@Component({
  selector: 'app-home',
  templateUrl: 'home.page.html',
  styleUrls: ['home.page.scss'],
})
export class HomePage {
  devices: any[] = [];
  statusMessage: string;
  deviceMode = true;

  constructor(
    public router: Router,
    private toastCtrl: ToastController,
    private ble: BLE,
    private ngZone: NgZone
  ) {}

  ionViewDidEnter() {
    console.log('ionViewDidEnter');
    this.scan();
  }

  scan() {
    this.setStatus('Scanning for Bluetooth LE Devices');
    this.devices = []; // clear list

    this.ble.scan([], 5).subscribe(
      device => this.onDeviceDiscovered(device),
      error => this.scanError(error)
    );

    setTimeout(this.setStatus.bind(this), 5000, 'Scan complete');
  }

  onDeviceDiscovered(device) {
    console.log('Discovered ' + JSON.stringify(device, null, 2));
    this.ngZone.run(() => {
      this.devices.push(device);
    });
  }

  // If location permission is denied, you'll end up here
  async scanError(error) {
    this.setStatus('Error ' + error);
    const toast = await this.toastCtrl.create({
      message: 'Error scanning for Bluetooth low energy devices',
      position: 'middle',
      duration: 5000
    });
    toast.present();
  }

  setStatus(message) {
    console.log(message);
    this.ngZone.run(() => {
      this.statusMessage = message;
    });
  }

  deviceSelected(device: any) {
    console.log(JSON.stringify(device) + ' selected');
      let navigationExtras: NavigationExtras = {
          queryParams: {
              special: JSON.stringify(device)
          }
      };
      this.router.navigate(['detail'], navigationExtras);
  }

}


Please note we have added one function named deviceSelected(device: any) This function take device information and sends it to details page.

We get BLE (Blue tooth low energy) device info as follows (This is log)
Ionic 4 bluetooth low energy - Connect BLE Devices - debugger screen

After we select device, we are navigated to details.page.html . 

In details.page.ts file, there three main activities

  1.   Read device information sent from home page - we are doing it in constructor
  2. Ble Connect function
  3. Ble Disconnect function
Check details.page.ts code carefully to understand how BLE (Bluetooth low energy) devices is connected and disconnected. 


import { Component, OnInit, NgZone } from '@angular/core';
import { ToastController } from '@ionic/angular';
import { ActivatedRoute, Router } from '@angular/router';
import { BLE } from '@ionic-native/ble/ngx';

@Component({
  selector: 'app-detail',
  templateUrl: './detail.page.html',
  styleUrls: ['./detail.page.scss']
 
})
export class DetailPage implements OnInit {

  peripheral: any = {};
  statusMessage: string;

    constructor(public route: ActivatedRoute, public router: Router, 
private ble: BLE,
      private toastCtrl: ToastController, private ngZone: NgZone) {

        this.route.queryParams.subscribe(params => {
          if (params && params.special) {
              const device = JSON.parse(params.special);
              this.setStatus('Connecting to ' + device.name || device.id);

              //Call BLE Connect - Connect to BLE Device
              this.BleConnect(device);
    
          }
      });
   }


    ngOnInit() {
  }

    BleConnect(device) {
        this.ble.connect(device.id).subscribe(
            peripheral => this.onConnected(peripheral),
            peripheral => this.onDeviceDisconnected(peripheral)
        );
    }

    BleDisconnect() {
        this.ble.disconnect(this.peripheral.id).then(
    () => console.log('Disconnected ' + JSON.stringify(this.peripheral)),
    () => console.log('ERROR disconnecting ' + JSON.stringify(this.peripheral)));
    }


    onConnected(peripheral) {
    this.ngZone.run(() => {
      this.setStatus('');
      this.peripheral = peripheral;
    });
  }

 async onDeviceDisconnected(peripheral) {
    const toast = await this.toastCtrl.create({
      message: 'The peripheral unexpectedly disconnected',
      duration: 3000,
      position: 'middle'
    });
    toast.present();
  }

  // Disconnect peripheral when leaving the page
  ionViewWillLeave() {
    console.log('ionViewWillLeave disconnecting Bluetooth');
      this.BleDisconnect();
  }

  setStatus(message) {
    console.log(message);
    this.ngZone.run(() => {
      this.statusMessage = message;
    });
  }

}

 
In detail.page.html, we are simply displaying Device information, Devices services
 
<ion-header>
    <ion-toolbar>
        <ion-title>{{ peripheral.name || 'Device' }}</ion-title>
    </ion-toolbar>
</ion-header>

<ion-content class="padding">

    <ion-card>
        <ion-card-header>
            {{ peripheral.name || 'Unnamed' }}
        </ion-card-header>
        <ion-card-content>
            {{ peripheral.id }}
        </ion-card-content>
    </ion-card>

    <ion-card>
        <ion-card-header>
            Services
        </ion-card-header>

        <ion-list>
            <ion-item ngfor="let service of peripheral.services">
                {{service}}
            </ion-item>
        </ion-list>
    </ion-card>

    <ion-card>
        <ion-card-header>
            Details
        </ion-card-header>
        <ion-card-content>
            <pre>{{peripheral | json }}</pre>
</ion-card-content>
    </ion-card>
</ion-content>

<ion-footer>
    <ion-toolbar>
        <ion-item>
            <ion-label>{{ statusMessage }}</ion-label>
        </ion-item>
    </ion-toolbar>
</ion-footer>

This is how we can connect to BLE Devices, using IONIC4.

 In next Article ionic 4 Bluetooth low energy - example code - Read Data from BLE Devices we shall read data from BLE devices.

ionic 4 bluetooth low energy - sample code - List BLE Devices

January 16, 2020 12 comments
This article will demonstrate usage of cordova-plugin-ble-central with IONIC 4. i.e. Mobile application connectivity with BlueTooth Low Energy Devices.

Before we start I assume that you already have ionic4 blank project working.

When you run ionic server command following screen should open in browser
ionic4 ble example code
Ionic4 BLE (Bluetooth Low energy sample/example code)

On command line or in visual studio terminal use following commands to install BLE  Ionic plugin


$ ionic cordova plugin add cordova-plugin-ble-central
$ npm install @ionic-native/ble
Above commands will add required cordova plugin and ionic4 wrapper for Bluetooth low energy devices communication. I am using default Home page to display list of available BLE Devices, on TAP of device it will be redirected to details page for further operations. We shall add following line of code to import BLE Home.page.ts file looks as follows


import { BLE } from '@ionic-native/ble/ngx';
import { Component, NgZone } from '@angular/core';
import { NavController, ToastController } from '@ionic/angular';


@Component({
  selector: 'app-home',
  templateUrl: 'home.page.html',
  styleUrls: ['home.page.scss'],
})
export class HomePage {

  constructor(
    public navCtrl: NavController,
    private toastCtrl: ToastController,
    private ble: BLE,
    private ngZone: NgZone
  ) {}

}


After this make sure BLE provider is added in app.module.ts

import { NgModule } from '@angular/core';
import { BrowserModule } from '@angular/platform-browser';
import { RouteReuseStrategy } from '@angular/router';

import { IonicModule, IonicRouteStrategy } from '@ionic/angular';
import { SplashScreen } from '@ionic-native/splash-screen/ngx';
import { StatusBar } from '@ionic-native/status-bar/ngx';

import { AppComponent } from './app.component';
import { AppRoutingModule } from './app-routing.module';

import { BLE } from '@ionic-native/ble/ngx';

@NgModule({
  declarations: [AppComponent],
  entryComponents: [],
  imports: [BrowserModule, IonicModule.forRoot(), AppRoutingModule],
  providers: [
    StatusBar,
    SplashScreen, BLE,
    { provide: RouteReuseStrategy, useClass: IonicRouteStrategy }
  ],
  bootstrap: [AppComponent]
})
export class AppModule {}


Now we shall add following functions for Bluetooth low energy (BLE) device discovery and listing BLE devices.

  • scan - scan for ble devices for 5 seconds.
  • onDeviceDiscovered - this function will execute if any BLE device is discovered.
  • scanError - this function will be called if any error occurs in scan function
  • setStatus - simple function to set message 
Above functions we are adding in home.page.ts file. Location setting should be on while scanning devices, else you will see error message


scan() {
    this.setStatus("Scanning for Bluetooth LE Devices");
    this.devices = []; // clear list

    this.ble.scan([], 5).subscribe(
      device => this.onDeviceDiscovered(device),
      error => this.scanError(error)
    );

    setTimeout(this.setStatus.bind(this), 5000, "Scan complete");
  }

  onDeviceDiscovered(device) {
    console.log("Discovered " + JSON.stringify(device, null, 2));
    this.ngZone.run(() => {
      this.devices.push(device);
    });
  }

  // If location permission is denied, you'll end up here
  async scanError(error) {
    this.setStatus("Error " + error);
    let toast = await this.toastCtrl.create({
      message: "Error scanning for Bluetooth low energy devices",
      position: "middle",
      duration: 5000
    });
    toast.present();
  }

  setStatus(message) {
    console.log(message);
    this.ngZone.run(() => {
      this.statusMessage = message;
    });
  }


Please check HTML of home.page.html

<ion-header>
  <ion-toolbar>
    <ion-title>
      BLE Connect
    </ion-title>
    <ion-buttons slot="end">
      <ion-button click="" scan="">
        Scan
      </ion-button>
    </ion-buttons>
  </ion-toolbar>
</ion-header>

<ion-content>
  <ion-list> 
    <ion-item click="" device="" deviceselected=""
 ngfor="let device of devices">
      <ion-label>
      <h2>
{{ device.name || 'Unnamed' }}</h2>
{{ device.id }}
     RSSI: {{ device.rssi }}


      </ion-label> 
    </ion-item>
   
   </ion-list> 
</ion-content>

<ion-footer>
  <ion-toolbar>
    <ion-item>
    <ion-label>{{ statusMessage }}</ion-label>
    </ion-item>
  </ion-toolbar>
</ion-footer>


Now build app using following command
ionic cordova build android 

This will create an APK file which will list BLE devices after scan. You can click on scan button or can add scan() function in ionViewDidEnter()


ionViewDidEnter() {
    console.log('ionViewDidEnter');
    this.scan();
  }


Now we are able to build Bluetooth low energy device listing app in ionic4

Mobile application connectivity with BlueTooth Low Energy Devices


In next Article ionic 4 bluetooth low energy - sample code - Connect to BLE Devices we shall connect to BLE devices.