How override ASP.NET Core Identity's password policy or How To Customize Password Policy in asp.net Core

February 07, 2020 0 comments
ASP.NET Core Identity uses default values for  password policy settings, in this article we shall see how to override or customize Asp.net Core Identity's password policy ?

By default, Identity requires that passwords contain an

  • uppercase character
  • lowercase character,
  • a digit
  • a non-alphanumeric character. 
  • Passwords must be at least six characters long. 

PasswordOptions
can be set in Startup.ConfigureServices.

To change password Policy, we shall add following lines of code in startup.cs file


 services.Configure(options =>
             {
                 // Password settings
                 options.Password.RequireDigit = true;
                 options.Password.RequiredLength = 6;
                 options.Password.RequireNonAlphanumeric = false;
                 options.Password.RequireUppercase = false;
                 options.Password.RequireLowercase = false;
             });


ionic 4 bluetooth low energy - example code - Read Data from BLE Devices

January 24, 2020 8 comments
Please refer two articles, for better understanding of BLE and IONIC connectivity and how to implement ionic 4 Bluetooth low energy devices communication.


In this article we shall communicate with BLE (Bluetooth Low energy) device with IONIC4.

To start BLE device we need to send some Command in my case it is ST (start + enter). 
Note: BLE takes one character at a time and also in HEX 
Hex code for S - 53 
Hex code for T - 54
Hex code for LF (Line feed) - 0A 

Also BLE device has their own Services and Characteristics, in previous article we had listed all the services associated with selected device. ref following code in previous article in details page (details.page.html)


<ion-list>
<ion-item ngfor="let service of peripheral.services">
  {{service}}
</ion-item>
</ion-list>


Standard BLE service is FFE0 and BLE characteristic with WriteWithoutResponse is FFE1

After connecting to BLE devices; we need to do following tasks to start reading data

  1. WriteWithoutResponse (Service FFE0 and Characteristic FFE1)
  2. Then Subscribe  to start getting value change notification  for Service FFE0 and Characteristic FFE1
Check following two snippets one for WriteWithoutResponse and another for StartGettingNotification


BleWrite() {

        // Subscribe for notifications when the resitance changes
        var inputdata = new Uint8Array(3);
        inputdata[0] = 0x53; // S
        inputdata[1] = 0x54; // T
        inputdata[2] = 0x0a; // LF

        this.ble
            .writeWithoutResponse(
                this.peripheral.id,
                BLE_SERVICE,
                BLE_CHARACTERISTIC,
                inputdata.buffer
            )
            .then(
                data => {
                    debugger;   
                    
                    console.log(data);
                    this.subscribe();
                },
                err => {
                    console.log(err);
                }
            );
    }

And for reading values from BLE device

subscribe() {
        this.ble
            .startNotification(this.peripheral.id,
 BLE_SERVICE, BLE_CHARACTERISTIC)
            .subscribe(
                data => {
                    console.log(data);
                    this.onValueChange(data);
                },
                () =>
               
        this.showAlert(
                 "Unexpected Error",
                 "Failed to subscribe for changes, please try to re-connect."
               )
            );
    }

In above function we are capturing data and passing it to onValueChange function. You can handle your data in onValueChange function. Data which we send and receive from BLE devices is always an ArrayBuffer. In above functions we have passed ST + LineFeed as array buffer input.buffer

So we need two more functions one to convert array buffer into plain character string and another function to capture valuechange


onValueChange(buffer: ArrayBuffer) {
        this.ngZone.run(() => {
            try {
                if (this.dataFromDevice == undefined)
 this.dataFromDevice = this.bytesToString(buffer).replace(/\s+/g, " ");
                else this.dataFromDevice += '
' + this.bytesToString(buffer).replace(/\s+/g, " ");

//Simply assign data to variable dataFromDevice and string concat
            } catch (e) {
                console.log(e);
            }
        });
    }

    bytesToString(buffer) {
        return String.fromCharCode.apply(null, new Uint8Array(buffer));
    }

This is how we read data from BLE devices using IONIC4. Ionic4 Ble example.

ionic 4 bluetooth low energy - sample code - Connect to BLE Devices

January 20, 2020 0 comments
In the previous article I had mentioned how to list BLE (Bluetooth Low energy devices), Please refer to Ionic-4 Bluetooth Low Energy Devices - List BLE Devices article.

In last article we had page Home, we had displayed BLE devices as follows. 
Ionic 4 - Ble - Bluetoothe low energy devices listing
List BLE Devices - IONIC 4

Now on click of Device, we shall redirect to Detail page, we shall pass BLE device information to Detail page. Thus we have modified our code of home.page.ts file as follows 


import { BLE } from '@ionic-native/ble/ngx';
import { Component, NgZone } from '@angular/core';
import { ToastController } from '@ionic/angular';
import { Router, NavigationExtras } from '@angular/router';

@Component({
  selector: 'app-home',
  templateUrl: 'home.page.html',
  styleUrls: ['home.page.scss'],
})
export class HomePage {
  devices: any[] = [];
  statusMessage: string;
  deviceMode = true;

  constructor(
    public router: Router,
    private toastCtrl: ToastController,
    private ble: BLE,
    private ngZone: NgZone
  ) {}

  ionViewDidEnter() {
    console.log('ionViewDidEnter');
    this.scan();
  }

  scan() {
    this.setStatus('Scanning for Bluetooth LE Devices');
    this.devices = []; // clear list

    this.ble.scan([], 5).subscribe(
      device => this.onDeviceDiscovered(device),
      error => this.scanError(error)
    );

    setTimeout(this.setStatus.bind(this), 5000, 'Scan complete');
  }

  onDeviceDiscovered(device) {
    console.log('Discovered ' + JSON.stringify(device, null, 2));
    this.ngZone.run(() => {
      this.devices.push(device);
    });
  }

  // If location permission is denied, you'll end up here
  async scanError(error) {
    this.setStatus('Error ' + error);
    const toast = await this.toastCtrl.create({
      message: 'Error scanning for Bluetooth low energy devices',
      position: 'middle',
      duration: 5000
    });
    toast.present();
  }

  setStatus(message) {
    console.log(message);
    this.ngZone.run(() => {
      this.statusMessage = message;
    });
  }

  deviceSelected(device: any) {
    console.log(JSON.stringify(device) + ' selected');
      let navigationExtras: NavigationExtras = {
          queryParams: {
              special: JSON.stringify(device)
          }
      };
      this.router.navigate(['detail'], navigationExtras);
  }

}


Please note we have added one function named deviceSelected(device: any) This function take device information and sends it to details page.

We get BLE (Blue tooth low energy) device info as follows (This is log)
Ionic 4 bluetooth low energy - Connect BLE Devices - debugger screen

After we select device, we are navigated to details.page.html . 

In details.page.ts file, there three main activities

  1.   Read device information sent from home page - we are doing it in constructor
  2. Ble Connect function
  3. Ble Disconnect function
Check details.page.ts code carefully to understand how BLE (Bluetooth low energy) devices is connected and disconnected. 


import { Component, OnInit, NgZone } from '@angular/core';
import { ToastController } from '@ionic/angular';
import { ActivatedRoute, Router } from '@angular/router';
import { BLE } from '@ionic-native/ble/ngx';

@Component({
  selector: 'app-detail',
  templateUrl: './detail.page.html',
  styleUrls: ['./detail.page.scss']
 
})
export class DetailPage implements OnInit {

  peripheral: any = {};
  statusMessage: string;

    constructor(public route: ActivatedRoute, public router: Router, 
private ble: BLE,
      private toastCtrl: ToastController, private ngZone: NgZone) {

        this.route.queryParams.subscribe(params => {
          if (params && params.special) {
              const device = JSON.parse(params.special);
              this.setStatus('Connecting to ' + device.name || device.id);

              //Call BLE Connect - Connect to BLE Device
              this.BleConnect(device);
    
          }
      });
   }


    ngOnInit() {
  }

    BleConnect(device) {
        this.ble.connect(device.id).subscribe(
            peripheral => this.onConnected(peripheral),
            peripheral => this.onDeviceDisconnected(peripheral)
        );
    }

    BleDisconnect() {
        this.ble.disconnect(this.peripheral.id).then(
    () => console.log('Disconnected ' + JSON.stringify(this.peripheral)),
    () => console.log('ERROR disconnecting ' + JSON.stringify(this.peripheral)));
    }


    onConnected(peripheral) {
    this.ngZone.run(() => {
      this.setStatus('');
      this.peripheral = peripheral;
    });
  }

 async onDeviceDisconnected(peripheral) {
    const toast = await this.toastCtrl.create({
      message: 'The peripheral unexpectedly disconnected',
      duration: 3000,
      position: 'middle'
    });
    toast.present();
  }

  // Disconnect peripheral when leaving the page
  ionViewWillLeave() {
    console.log('ionViewWillLeave disconnecting Bluetooth');
      this.BleDisconnect();
  }

  setStatus(message) {
    console.log(message);
    this.ngZone.run(() => {
      this.statusMessage = message;
    });
  }

}

 
In detail.page.html, we are simply displaying Device information, Devices services
 
<ion-header>
    <ion-toolbar>
        <ion-title>{{ peripheral.name || 'Device' }}</ion-title>
    </ion-toolbar>
</ion-header>

<ion-content class="padding">

    <ion-card>
        <ion-card-header>
            {{ peripheral.name || 'Unnamed' }}
        </ion-card-header>
        <ion-card-content>
            {{ peripheral.id }}
        </ion-card-content>
    </ion-card>

    <ion-card>
        <ion-card-header>
            Services
        </ion-card-header>

        <ion-list>
            <ion-item ngfor="let service of peripheral.services">
                {{service}}
            </ion-item>
        </ion-list>
    </ion-card>

    <ion-card>
        <ion-card-header>
            Details
        </ion-card-header>
        <ion-card-content>
            <pre>{{peripheral | json }}</pre>
</ion-card-content>
    </ion-card>
</ion-content>

<ion-footer>
    <ion-toolbar>
        <ion-item>
            <ion-label>{{ statusMessage }}</ion-label>
        </ion-item>
    </ion-toolbar>
</ion-footer>

This is how we can connect to BLE Devices, using IONIC4.

 In next Article ionic 4 Bluetooth low energy - example code - Read Data from BLE Devices we shall read data from BLE devices.

ionic 4 bluetooth low energy - sample code - List BLE Devices

January 16, 2020 12 comments
This article will demonstrate usage of cordova-plugin-ble-central with IONIC 4. i.e. Mobile application connectivity with BlueTooth Low Energy Devices.

Before we start I assume that you already have ionic4 blank project working.

When you run ionic server command following screen should open in browser
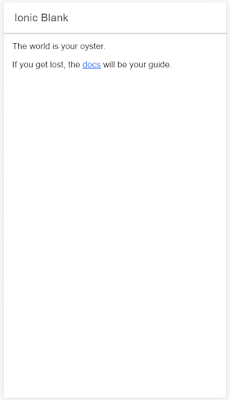
ionic4 ble example code
Ionic4 BLE (Bluetooth Low energy sample/example code)

On command line or in visual studio terminal use following commands to install BLE  Ionic plugin


$ ionic cordova plugin add cordova-plugin-ble-central
$ npm install @ionic-native/ble
Above commands will add required cordova plugin and ionic4 wrapper for Bluetooth low energy devices communication. I am using default Home page to display list of available BLE Devices, on TAP of device it will be redirected to details page for further operations. We shall add following line of code to import BLE Home.page.ts file looks as follows


import { BLE } from '@ionic-native/ble/ngx';
import { Component, NgZone } from '@angular/core';
import { NavController, ToastController } from '@ionic/angular';


@Component({
  selector: 'app-home',
  templateUrl: 'home.page.html',
  styleUrls: ['home.page.scss'],
})
export class HomePage {

  constructor(
    public navCtrl: NavController,
    private toastCtrl: ToastController,
    private ble: BLE,
    private ngZone: NgZone
  ) {}

}


After this make sure BLE provider is added in app.module.ts

import { NgModule } from '@angular/core';
import { BrowserModule } from '@angular/platform-browser';
import { RouteReuseStrategy } from '@angular/router';

import { IonicModule, IonicRouteStrategy } from '@ionic/angular';
import { SplashScreen } from '@ionic-native/splash-screen/ngx';
import { StatusBar } from '@ionic-native/status-bar/ngx';

import { AppComponent } from './app.component';
import { AppRoutingModule } from './app-routing.module';

import { BLE } from '@ionic-native/ble/ngx';

@NgModule({
  declarations: [AppComponent],
  entryComponents: [],
  imports: [BrowserModule, IonicModule.forRoot(), AppRoutingModule],
  providers: [
    StatusBar,
    SplashScreen, BLE,
    { provide: RouteReuseStrategy, useClass: IonicRouteStrategy }
  ],
  bootstrap: [AppComponent]
})
export class AppModule {}


Now we shall add following functions for Bluetooth low energy (BLE) device discovery and listing BLE devices.

  • scan - scan for ble devices for 5 seconds.
  • onDeviceDiscovered - this function will execute if any BLE device is discovered.
  • scanError - this function will be called if any error occurs in scan function
  • setStatus - simple function to set message 
Above functions we are adding in home.page.ts file. Location setting should be on while scanning devices, else you will see error message


scan() {
    this.setStatus("Scanning for Bluetooth LE Devices");
    this.devices = []; // clear list

    this.ble.scan([], 5).subscribe(
      device => this.onDeviceDiscovered(device),
      error => this.scanError(error)
    );

    setTimeout(this.setStatus.bind(this), 5000, "Scan complete");
  }

  onDeviceDiscovered(device) {
    console.log("Discovered " + JSON.stringify(device, null, 2));
    this.ngZone.run(() => {
      this.devices.push(device);
    });
  }

  // If location permission is denied, you'll end up here
  async scanError(error) {
    this.setStatus("Error " + error);
    let toast = await this.toastCtrl.create({
      message: "Error scanning for Bluetooth low energy devices",
      position: "middle",
      duration: 5000
    });
    toast.present();
  }

  setStatus(message) {
    console.log(message);
    this.ngZone.run(() => {
      this.statusMessage = message;
    });
  }


Please check HTML of home.page.html

<ion-header>
  <ion-toolbar>
    <ion-title>
      BLE Connect
    </ion-title>
    <ion-buttons slot="end">
      <ion-button click="" scan="">
        Scan
      </ion-button>
    </ion-buttons>
  </ion-toolbar>
</ion-header>

<ion-content>
  <ion-list> 
    <ion-item click="" device="" deviceselected=""
 ngfor="let device of devices">
      <ion-label>
      <h2>
{{ device.name || 'Unnamed' }}</h2>
{{ device.id }}
     RSSI: {{ device.rssi }}


      </ion-label> 
    </ion-item>
   
   </ion-list> 
</ion-content>

<ion-footer>
  <ion-toolbar>
    <ion-item>
    <ion-label>{{ statusMessage }}</ion-label>
    </ion-item>
  </ion-toolbar>
</ion-footer>


Now build app using following command
ionic cordova build android 

This will create an APK file which will list BLE devices after scan. You can click on scan button or can add scan() function in ionViewDidEnter()


ionViewDidEnter() {
    console.log('ionViewDidEnter');
    this.scan();
  }


Now we are able to build Bluetooth low energy device listing app in ionic4

Mobile application connectivity with BlueTooth Low Energy Devices


In next Article ionic 4 bluetooth low energy - sample code - Connect to BLE Devices we shall connect to BLE devices.

Windows 10 Set time automatically not working

December 28, 2019 0 comments
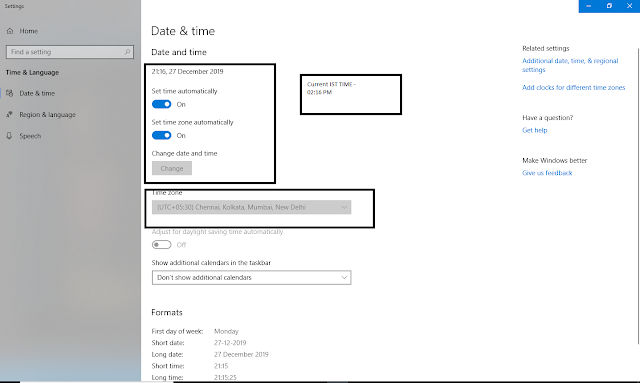
After completing fresh installation of Windows 10 Enterprise Edition, I was setting Date and Time and every time I restart computer it use to get back to some other timings.

I had set time automatically and also set time zone automatically as per the screenshot

Windows 10 Set time automatically not working


To resolve this issue, I followed following steps
  1. Press Windows key + r ( + r).
  2. Type services.msc.
  3. Click Windows Time in the Name column.
    set time automatically is not working in windows 10
  4. Alternate click/ Right click and then click Properties.
  5. Change Startup type to Automatic (if it’s not already set to Automatic).
    Change startup type from manual to automatic if windows 10 set time automatically is not working
  6. Click Start if the service isn’t started.
Now Windows 10 Set time automatically starts working.

How to force HTTPS using a web.config file / Redirect Http to Https using web.config

December 27, 2019 0 comments
http to https using web.config, Use web.config to redirect HTTP to HTTPs, redirect to https using web config file in .net

How to redirect http to https using web config ? To do permanent redirect to https using web.config under Configuration section in web.config file simply add following Rewriting rules.


This way we can redirect all Http request to Https using web.config

  • Web.config URL rewrite - force www prefix and https
  • Use web.config to redirect HTTP to HTTPs
  • How to configure your web.config to Redirect http to https
  • Web.config redirects with rewrite rules - https
  • 301 redirect entire site http to https using web.config
  • How to force HTTPS from web.config file

Asp.Net Core 2.2 - HTTP Error 500.0 - ANCM In-Process Handler Load Failure

May 16, 2019 1 comments
While deploying .net core web application, I got an Error saying

HTTP Error 500.0 - ANCM In-Process Handler Load Failure

Common causes of this issue:

  • The specified version of Microsoft.NetCore.App or Microsoft.AspNetCore.App was not found.
  • The in process request handler, Microsoft.AspNetCore.Server.IIS, was not referenced in the application.
  • ANCM could not find dotnet.

Troubleshooting steps:

  • Check the system event log for error messages
  • Enable logging the application process' stdout messages
  • Attach a debugger to the application process and inspect

For more information visit: https://go.microsoft.com/fwlink/?LinkID=2028526


When I checked web.config there is following line of code


Change AspNetCoreModuleV2 to AspNetCoreModule make the application work.


You may face this issue in Azure environment too.
Aspnetcore 2.2 Targetting .Net Framework, InProcess fails on azure app service with error TTP Error 500.0 - ANCM In-Process Handler Load Failure


http error 500.0 - ancm in-process handler load failure iis express

http error 500.0 - ancm in-process handler load failure localhost

http error 500.0 - ancm in-process handler load failure stackoverflow

ancm in-process handler load failure swagger

swagger http error 500.0 - ancm in-process handler load failure

azure http error 500.0 - ancm in-process handler load failure

ancm in-process handler load failure azure

ancm could not find dotnet.

Mvc Core - Multiple custom attributes of the same type found - new scaffoled item - controller with view

April 27, 2019 0 comments
While working on myAttendance.io project in mvc.net core 2.2, I was creating a company and wanted to generate Controller with Views. My company Class is as follows


 public class Company : BaseModel
    {
        public string Logo { get; set; }

        [DisplayName("Company Name")]
        [Required]
        [MaxLength(150)]
        public string CompanyName { get; set; }

        [RegularExpression(@"^([a-zA-Z0-9_\-\.]+)@((\[[0-9]{1,3}\.[0-9]{1,3}\.[0-9]{1,3}\.)|(([a-zA-Z0-9\-]+\.)+))([a-zA-Z]{2,4}|[0-9]{1,3})(\]?)$", ErrorMessage = "Please enter a valid e-mail address")]
        [EmailAddress(ErrorMessage = "Please enter valid email address.")]
        [Required]
        [MaxLength(150)]
        public string Email { get; set; }
        [Required]
        [DataType(DataType.Url)]
        [Url(ErrorMessage = "Invalid URL!")]
        [MaxLength(150)]
        public string Web { get; set; }

        [Phone]
        [Required]
        [MaxLength(15)]
        public string Phone { get; set; }

        [Required]
        [MaxLength(10)]
        public string Currency { get; set; }
        [Required]
        [MaxLength(250)]
        public string Address { get; set; }

    }
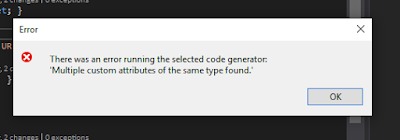
When I tried adding New Scaffolded item, I got error saying
 There was an error running the selected code generator: 'Multiple custom attributes of the same type found'

Multiple custom attributes of the same type found

To resolve this error I had to remove
[DataType(DataType.Url)]
If we see model then I have already used
[Url(ErrorMessage = "Invalid URL!")]
This same is applicable for followings
[EmailAddress(ErrorMessage = "Please enter valid email address.")]

[Phone(ErrorMessage = "Please enter valide phone number.")]
We have EmailAddress and PhoneNumber as Datatype also
[DataType(DataType.EmailAddress)]

[DataType(DataType.PhoneNumber)]
So Just make sure we have DataType or corresponding Tag to avoid 'Multiple custom attributes of the same type found.'

InvalidOperationException Unable to resolve service for type Interface while attempting to activate Controller

April 17, 2019 0 comments
A dependency is any object that another object requires, Dependency Injection i.e. DI is used for objects which has complex dependencies. While working on one project in asp.net core 2.2 (MVC project, I came across this error)

An unhandled exception occurred while processing the request.

InvalidOperationException: Unable to resolve service for type 'myproject.Areas.myArea.Interfaces.IHolidayRepository' while attempting to activate 'myproject.Areas.myArea.Controllers.AdminController'.
Microsoft.Extensions.DependencyInjection.ActivatorUtilities.GetService(IServiceProvider sp, Type type, Type requiredBy, bool isDefaultParameterRequired)

Dependency Injection (DI) is already part of Core framework, We just have to register our dependencies in startup.cs file under ConfigurationService method.

services.AddTransient<IFoo, Foo>();
services.AddSingleton<IBar, Bar>();
services.AddScoped<IHello, Hello>();

ASP.NET services can be configured with the following:

Transient

Always Different - Transient objects are always different; a new instance is provided to every controller and every service.

Scoped

Same within a request - Scoped objects are the same within a request, but different across different requests

Singleton
Singleton objects are the same for every object and every request (regardless of whether an instance is provided in ConfigureServices)

After Registering Dependency Injection in startup.cs file, we will not get InvalidOperationException Unable to resolve service for type Interface while attempting to activate Controller error.

Reference Article - https://docs.microsoft.com/en-us/aspnet/core/mvc/controllers/dependency-injection?view=aspnetcore-2.2

More than one DbContext named 'myproject.Models.myprojectContext' was found. Specify which one to use by providing its fully qualified name using its exact case

April 15, 2019 0 comments

I was developing a Web-Application in Asp.Net Core 2.2 . After I added the new identity with scaffold it generated me these codes:
For IdentityHostingStartup.cs


[assembly:
 HostingStartup(typeof(myproject.Areas.Identity.IdentityHostingStartup))]
namespace myproject.Areas.Identity
{
    public class IdentityHostingStartup : IHostingStartup
    {
     public void Configure(IWebHostBuilder builder)
      {
      builder.ConfigureServices((context, services) => {
      services.AddDbContext(options =>
       options.UseSqlServer(
       context.Configuration.GetConnectionString("myprojectContextConnection")));

        services.AddDefaultIdentity()
                .AddEntityFrameworkStores();
            });
        }
    }
}

Code in my Startup.cs (After adding Identity I made some modifications in startup.cs, with reference to this article)

public class Startup
    {
        public Startup(IConfiguration configuration)
        {
            Configuration = configuration;
        }

        public IConfiguration Configuration { get; }

        // This method gets called by the runtime. 
        //Use this method to add services to the container.
        public void ConfigureServices(IServiceCollection services)
        {
            services.Configure(options =>
            {
        // This lambda determines whether user consent for 
       //non-essential cookies is needed for a given request.
                options.CheckConsentNeeded = context => true;
                options.MinimumSameSitePolicy = SameSiteMode.None;
            });


 services.AddMvc().SetCompatibilityVersion(CompatibilityVersion.Version_2_2)
.AddRazorPagesOptions(options =>
        {
        options.AllowAreas = true;
        options.Conventions.AuthorizeAreaFolder("Identity", "/Account/Manage");
        options.Conventions.AuthorizeAreaPage("Identity", "/Account/Logout");
        });

      services.ConfigureApplicationCookie(options =>
        {
        options.LoginPath = $"/Identity/Account/Login";
        options.LogoutPath = $"/Identity/Account/Logout";
        options.AccessDeniedPath = $"/Identity/Account/AccessDenied";
        });

        services.Configure(Configuration.GetSection("EmailSettings"));
        services.AddSingleton();
        services.AddScoped();

        }

        // This method gets called by the runtime. 
       //Use this method to configure the HTTP request pipeline.
 public void Configure(IApplicationBuilder app, IHostingEnvironment env)
        {
            if (env.IsDevelopment())
            {
                app.UseDeveloperExceptionPage();
            }
            else
            {
                app.UseExceptionHandler("/Home/Error");
                app.UseHsts();
            }

            app.UseHttpsRedirection();
            app.UseStaticFiles();
            app.UseCookiePolicy();
            app.UseAuthentication();
            app.UseMvc(routes =>
            {
                routes.MapRoute(
                    name: "default",
                    template: "{controller=Home}/{action=Index}/{id?}");
            });
        }
    }

This was working fine, then I added new models and wanted to scaffold a model with controller and views using Entity Framework. After I set up everything and click ok, I started getting error saying : More than one DbContext named 'myproject.Models.myprojectContext' was found. Specify which one to use by providing its fully qualified name using its exact case.

More than one DbContext was found. Specify which one to use by providing its fully qualified name using its exact case.


 To resolve this issue I removed following lines of code from IdentityHostingStartup.cs

  services.AddDbContext(options =>
   options.UseSqlServer(
   context.Configuration.GetConnectionString("myprojectContextConnection")));

And I modified my startup.cs file to following

 public class Startup
    {
        public Startup(IConfiguration configuration)
        {
            Configuration = configuration;
        }

        public IConfiguration Configuration { get; }

        // This method gets called by the runtime. 
        //Use this method to add services to the container.
 public void ConfigureServices(IServiceCollection services)
   {
    services.Configure(options =>
      {
      // This lambda determines whether user consent for 
      //non-essential cookies is needed for a given request.
       options.CheckConsentNeeded = context => true;
       options.MinimumSameSitePolicy = SameSiteMode.None;
      });

  services.AddDbContext(options =>
  options.UseSqlServer(Configuration
.GetConnectionString("myprojectContextConnection")));


  services.AddMvc().SetCompatibilityVersion(CompatibilityVersion.Version_2_2)
.AddRazorPagesOptions(options =>
    {
    options.AllowAreas = true;
    options.Conventions.AuthorizeAreaFolder("Identity", "/Account/Manage");
    options.Conventions.AuthorizeAreaPage("Identity", "/Account/Logout");
     });

   services.ConfigureApplicationCookie(options =>
    {
    options.LoginPath = $"/Identity/Account/Login";
    options.LogoutPath = $"/Identity/Account/Logout";
    options.AccessDeniedPath = $"/Identity/Account/AccessDenied";
     });

    services.Configure(Configuration.GetSection("EmailSettings"));
    services.AddSingleton();
    services.AddScoped();

    }

        // This method gets called by the runtime. 
        //Use this method to configure the HTTP request pipeline.
        public void Configure(IApplicationBuilder app, IHostingEnvironment env)
        {
            if (env.IsDevelopment())
            {
                app.UseDeveloperExceptionPage();
            }
            else
            {
                app.UseExceptionHandler("/Home/Error");
                // The default HSTS value is 30 days. You may want to change 
                //this for production scenarios,
                // see https://aka.ms/aspnetcore-hsts.
                app.UseHsts();
            }

            app.UseHttpsRedirection();
            app.UseStaticFiles();
            app.UseCookiePolicy();
            app.UseAuthentication();
            app.UseMvc(routes =>
            {
                routes.MapRoute(
                    name: "default",
                    template: "{controller=Home}/{action=Index}/{id?}");
            });
        }
    }

Now I try generating Scaffold items it works without any error.