public IEnumerable <T> PickRandom<T>(IEnumerable<T> list, int number)
{
    var random = new Random();
    var total = list.Count();
    var required = number;
    foreach (var item in list)
    {
        if (random.Next(total) < required)
        {
            required--;
            yield return item;
            if (required == 0)
            {
                break;
            }
        }
        total--;
    }
}
How to select N Random Items from the List in C#
How to add/embed custom font in xamarin forms
Embedding fonts in Xamarin Forms is the best way to use fonts, there is no need to add platform specific fonts and code. Its just adding one file and adding one attribute in shared code; that's it; we are ready to use fonts in our code.
How to add fonts in Xamarin Forms
In just three steps we shall add custom fonts in Xamarin forms and use it across all the platforms i.e. Android, iOS and UWP.
Before we get into Embedding fonts in Xamarin Forms, lets create a Xamarin Form project using following steps.
After creating project make sure it builds and we are able to see it on Emulator or on Mobile Device
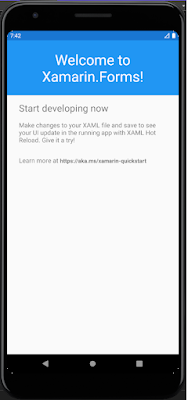
After building the Xamarin Form and running it on simulator, we see simple (default) UI as follows
For Demo purpose we shall use a custom fonts named - Game Of Squids, you can download it using the link - https://www.dafont.com/game-of-squids.font
Add the font file (ttf or otf) to our project and mark it as embedded resource
Now to Embed or Add above custom font in Xamarin Forms, use following steps
Create folder structure - Resources > Fonts > GameOfSquids.ttf
Copy font and then click on properties as shown in following image
We have to make sure we select Build Action as Embedded Resource as per following image
If we don't set Build Action as Embedded resource then font added in Xamarin forms will not get applied. We have to make sure Font added in Xamarin forms had build Action set as Embedded Resource.
Add ExportFont attribute in our shared code
[assembly: ExportFont("GameOfSquids.ttf", Alias = "GameOfSquids")]
AssemblyInfo.cs code changes to following
using Xamarin.Forms;
using Xamarin.Forms.Xaml;

[assembly: XamlCompilation(XamlCompilationOptions.Compile)]
[assembly: ExportFont("GameOfSquids.ttf", Alias = "GameOfSquids")]
Now simply Consume the font in our controls
This is how we add custom fonts in Xamarin form
How to Temporarily disable all foreign key constraints
While working with MSSQL and Asp.net Core with Entity Framework, many times we have came across a situation where we have to migrate data from one database to newly created database. e.g. Copying all the data from Production DB to Testing DB.
- Using Entity Framework Code First approach, we create database
- Once database is created, need to copy all the data from MSSQL (Generate script > Dataonly); create Database script for the data
- Now while running the script generated from PROD db to Test DB (there could me some modifications in test db, some columns are added) , we need to disable foreign key constraint and then re-enable foreign key constraints
How to disable all the foreign key constraints in MSSQL and then again re-enable all the foreign key constraints in MSSQL
-- Disable all the constraint in database
EXEC sp_msforeachtable 'ALTER TABLE ? NOCHECK CONSTRAINT all'

-- Enable all the constraint in database
EXEC sp_msforeachtable 'ALTER TABLE ? WITH CHECK CHECK CONSTRAINT all'
Calculate next due date based on start date frequency and current date in c#
Company has clients, each has different invoice start date and invoice frequency. I had to calculate and display next invoice date from current date + next month. i.e. invoice will always be raised in next month of service completion. e.g. Client A has invoice start date 01-Jan-2021 and invoice frequency is 5 months. Date when I am writing this post is 17-April-2021. So now next invoice date for Client A is 01-June-2021. For client B invoice start date is 01-March-2021 and invoice frequency is 3 months, then its next invoice date is 01-June-2021 and so on for all other client.
public class DateHelper
{
 public static DateTime nextInvoiceDate(DateTime? InvoicingStartDate,
    string invoicingFrequency)
     {
     int occurrence =
     (DateTime.Now.Month - Convert.ToInt32(InvoicingStartDate?.Month))
     / Convert.ToInt32(invoicingFrequency);

     int restInt =
     (DateTime.Now.Month - Convert.ToInt32(InvoicingStartDate?.Month))
     % Convert.ToInt32(invoicingFrequency);
     DateTime next = InvoicingStartDate.Value;
            int multi;
            if (restInt == 0 && DateTime.Now < InvoicingStartDate)
            {
                if (Convert.ToInt32(invoicingFrequency) == 1 && occurrence < 0)
                {
                    multi = 1;
                }
                else
                {
                    multi = Convert.ToInt32(invoicingFrequency)
                    * Math.Abs(occurrence);
                }

            }
            else
            {
                if (Convert.ToInt32(invoicingFrequency) == 1)
                {
                    multi = Convert.ToInt32(invoicingFrequency)
                    * (Math.Abs(occurrence));
                }
                else
                {
                    multi = Convert.ToInt32(invoicingFrequency)
                    * (Math.Abs(occurrence) + 1);
                }

            }
            return next.AddMonths(multi);

        }
}- How to calculate a future date based on a given date ?
- Calculate next due date based on start date frequency and current date ?
- How to nearest future date from given date and frequency ?
- Best way to calculate next date from start plus frequency
- How to calculate next meeting date based on given frequency ?
After Configuring IIS on VM Server - How to access sites hosted on IIS On VM over internet
Once we are done with Installing IIS on Azure VM, we need to open port 80 to access hosted website from internet.
Check - How to Setup IIS On Azure VM
To Enable port 80, simply login to your Azure portal, and click on VM
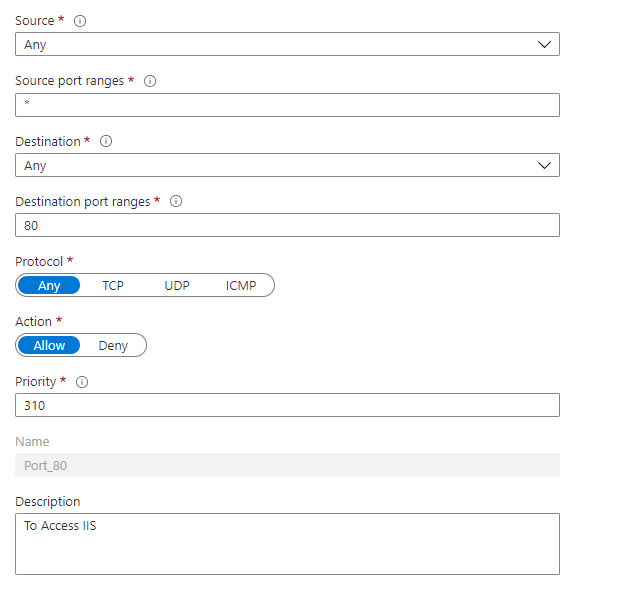
Then click on Networking, on click of Networking, network interface will open up, then clikc on Add Inbound port rule.
And add port 80
Once you create a rule, simply hit the Azure VM IP address from browser, it should show you default IIS page.
This is how we allow HTTP traffic to IIS hosted site on Azure VM server
How To Setup IIS on Azure VM - Configure IIS on Azure VM
Once we have setup the Azure VM, next important thing is to Setup an IIS in the windows server and enable it to access from anywhere. So that we can host our web application on VM and access it over an Internet.
In this article, we shall achieve it.
To Enable IIS on Azure VM server
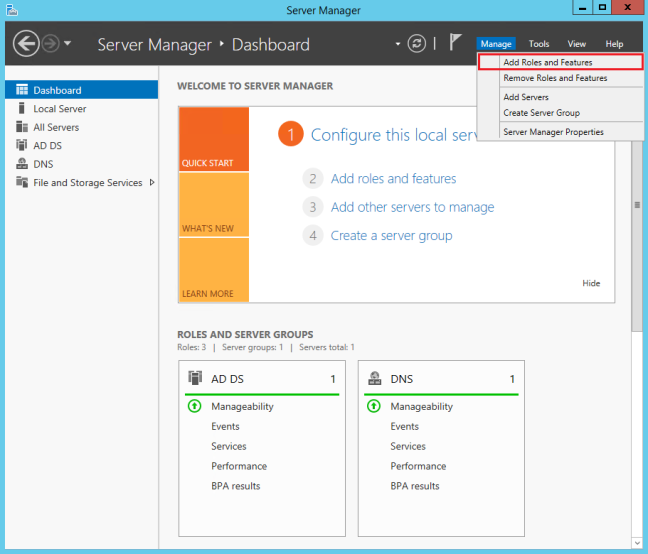
- Under Server Manager click on Manage > Add Roles and Features
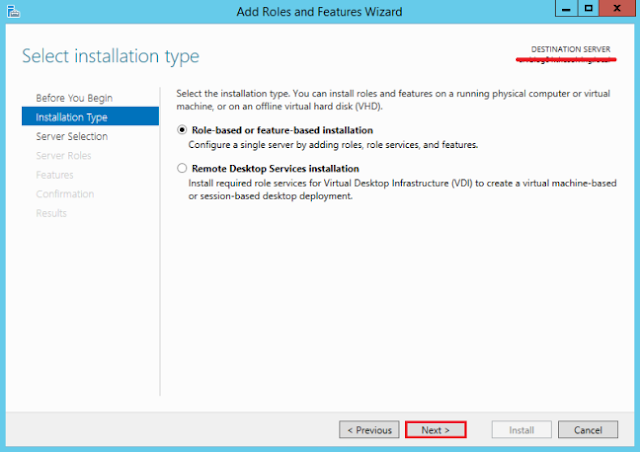
Click next and go to Select Installation Type, select Role-Based or feature-based installation
On click of Next you will go to Server Selection screen, here you will see default server under server pool. Make sure Select a server from the server pool is selected
Now in Server Roles select Web Server (IIS)
Once we select Web Server (IIS) and click on Next, one pop up will appear, click on Add Features, check following image
Now select .Net framework 4.5 Features and any other required feature from list and click on next
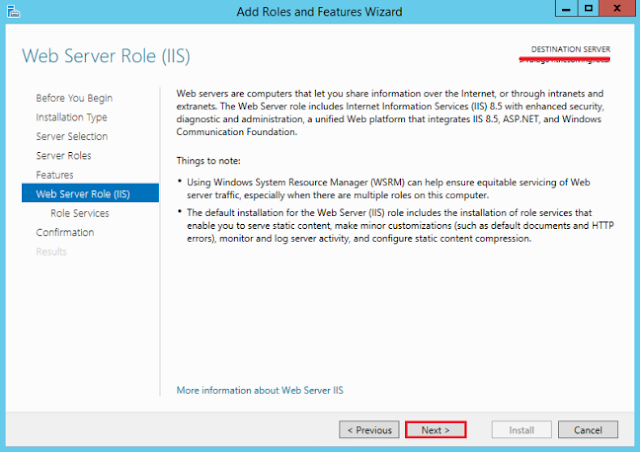
Click on Next
Click on Next and Select from Role Services
Now you will see confirmation screen
Now on click of install, IIS will be installed on Azure VM.
You can run IIS using inetmgr command
Do Win+R and type inetmger and IIS will open up.
This is how we should Setup IIS on Azure VM
The razortaghelper task failed unexpectedly
After updating Visual studio to New version, I suddenly started getting error
the razortaghelper task failed unexpectedly
Well after doing some research on Internet I came across following solutions
Added the following environment variable to my user environment to make it build again:
DOTNET_HOST_PATH%ProgramFiles%\dotnet\dotnet.exe
Simply go to Environment Variable, check following images
After clicking on Environment Variables, click on New, Pop up will open up, simply add entries as per following image and click Ok
How to compile Less, sass/scss, JSX, ES6, CoffeeScript in visual studio
It is very easy to compile LESS and SCSS files in visual studio. To do this we have to use Web Compiler extension. Web compiler extension generates css file from LESS and SCSS files on run time.
Lets Install the Extension
- Compilation of LESS, Scss, Stylus, JSX, ES6 and CoffeeScript files
- Saving a source file which triggers re-compilation automatically
- Specify compiler options for each individual file
- Error list is integrated
- MSBuild support for CI scenarios
- Minify the compiled output
- Customizable minification options for each language
- Displays a watermark when opening generated file
- Shortcut to compile all specified files in solution
- Task runner explorer is integrated
- Command line interface
.less, .scss, .styl, .jsx, .es6 or .coffee
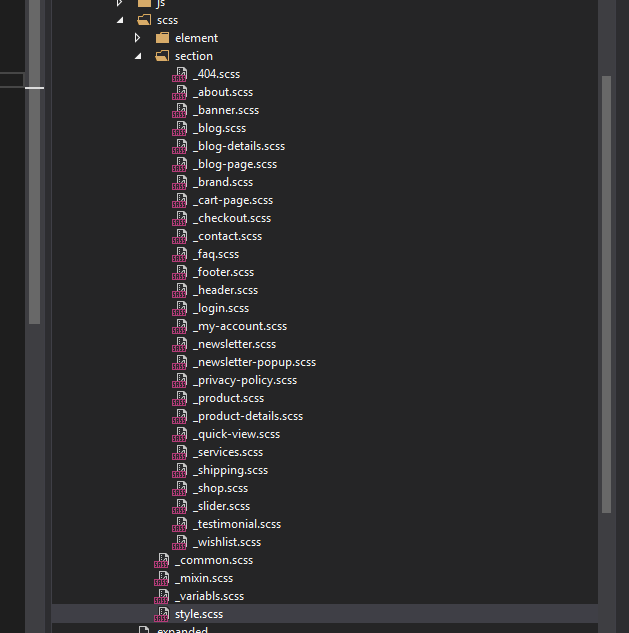
@import 'variabls';
@import 'mixin';
@import 'common';
@import 'element/button';
@import 'section/header';
@import 'section/slider';
@import 'section/banner';
@import 'section/product';
@import 'section/blog';
@import 'section/newsletter';
@import 'section/shipping';
@import 'section/testimonial';
@import 'section/brand';
@import 'section/footer';
@import 'section/shop';
@import 'section/product-details';
@import 'section/cart-page';
@import 'section/checkout';
@import 'section/wishlist';
@import 'section/contact';
@import 'section/login';
@import 'section/faq';
@import 'section/my-account';
@import 'section/about';
@import 'section/services';
@import 'section/blog-page';
@import 'section/blog-details';
@import 'section/quick-view';
@import 'section/newsletter-popup';
@import 'section/404';
@import 'section/privacy-policy';
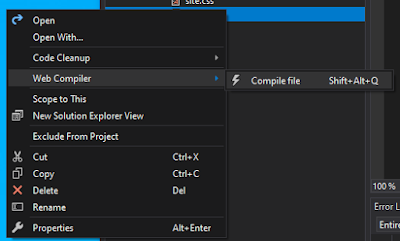
Now simply right click on the style.scss file and click on Web Compiler > Compile file.
[
  {
    "outputFile": "wwwroot/assets/css/style.css",
    "inputFile": "wwwroot/assets/scss/style.scss"
  }
]
We can always change the outputFile path to our css folder, I have changed it in this example to css file.
Similary there is one more file named compilerconfig.json.defaults which get generated and can be used to configure minification of js/css, check following file and you can modify it as per your requirements
{
  "compilers": {
    "less": {
      "autoPrefix": "",
      "cssComb": "none",
      "ieCompat": true,
      "strictMath": false,
      "strictUnits": false,
      "relativeUrls": true,
      "rootPath": "",
      "sourceMapRoot": "",
      "sourceMapBasePath": "",
      "sourceMap": false
    },
    "sass": {
      "autoPrefix": "",
      "includePath": "",
      "indentType": "space",
      "indentWidth": 2,
      "outputStyle": "nested",
      "Precision": 5,
      "relativeUrls": true,
      "sourceMapRoot": "",
      "lineFeed": "",
      "sourceMap": false
    },
    "stylus": {
      "sourceMap": false
    },
    "babel": {
      "sourceMap": false
    },
    "coffeescript": {
      "bare": false,
      "runtimeMode": "node",
      "sourceMap": false
    },
    "handlebars": {
      "root": "",
      "noBOM": false,
      "name": "",
      "namespace": "",
      "knownHelpersOnly": false,
      "forcePartial": false,
      "knownHelpers": [],
      "commonjs": "",
      "amd": false,
      "sourceMap": false
    }
  },
  "minifiers": {
    "css": {
      "enabled": true,
      "termSemicolons": true,
      "gzip": false
    },
    "javascript": {
      "enabled": true,
      "termSemicolons": true,
      "gzip": false
    }
  }
}
This is how we can compile Less, sass/scss, jsx, CoffeeScript in visual studio, we can also use this web pack to minify JS files.How DBCC CHECKIDENT Works - How to Reset identity seed after deleting records in SQL Server
Now say I have total 100 records and I delete all the records, in this case when I insert new records its primary key ID starts with 101, where as I want it to reset to 1.
So after deleting all records from SQL Server data table, I wanted to reset identity seed to 0, so my next insert should have primary key as 1,2,3 and so on.
  DBCC CHECKIDENT (table_name [, { NORESEED | { RESEED [, new_reseed_value ]}}])
[ WITH NO_INFOMSGS ]
DBCC CHECKIDENT ('[TableName]', RESEED, 0);
GO
DBCC
CHECKIDENT ('[TableName]', RESEED, 10);
You can't use DBCC CHECKIDENT for the following tasks:
We cannot Change the original seed value specified for an identity column when the table or view was created.
Cannot be used to Reseed existing rows in a table or view.
To change the original seed value and reseed any existing rows, we need to drop the identity column and recreate it specifying the new seed value. When the table contains data, the identity numbers are added to the existing rows with the specified seed and increment values. The order in which the rows are updated isn't guaranteed.
The entity type 'IdentityUserLogin' requires a primary key to be defined.
InvalidOperationException: The entity type 'IdentityUserLogin<string>' requires a primary key to be defined.I was doing following thing in my application
- I wanted to set Unique Key constraint on Email for my two models i.e. Vendor and Member model so I had added code below in my ApplicationDbContext file. (You may have different name for your DbContext file.)
 public class ApplicationDbContext : IdentityDbContext<ApplicationUser>
    {
     public ApplicationDbContext(DbContextOptions<ApplicationDbContext> options)
          : base(options)
        {

        }

        protected override void OnModelCreating(ModelBuilder builder)
        {
            builder.Entity<Member>().HasIndex(m => m.Email).IsUnique();
            builder.Entity<Vendor>().HasIndex(v => v.Email).IsUnique();
        }

        public DbSet<Vendor> Vendors { get; set; }

        public DbSet<Member> Members { get; set; }

    }
InvalidOperationException: The entity type 'IdentityUserLogin' requires a primary key to be defined.
public class ApplicationDbContext : IdentityDbContext<ApplicationUser>
    {
     public ApplicationDbContext(DbContextOptions<ApplicationDbContext> options)
          : base(options)
        {

        }

        protected override void OnModelCreating(ModelBuilder builder)
        {
            builder.Entity<Member>().HasIndex(m => m.Email).IsUnique();
            builder.Entity<Vendor>().HasIndex(v => v.Email).IsUnique();

              base.OnModelCreating(builder);
        }

        public DbSet<Vendor> Vendors { get; set; }

        public DbSet<Member> Members { get; set; }

    }


